Creative Editor
The Tenovos Creative Editor provides editing capabilities for photos and videos directly from the Tenovos Enterprise DAM. It streamlines asset creation by letting you edit content directly in Tenovos and then save the edited content as new assets within the platform, and even relate them back to the original.
From the Asset Details page in Tenovos, clicking Edit Photo or Edit Video opens the Creative Editor. Editing photo content includes cropping presets for popular social media and print formats, text overlays, and color adjustments. Editing of video content includes frame accurate clipping along with additional options for timeline splicing, text overlay, and other adjustments.
When saving edited content, you can Save to DAM or Save and Relate. Save to DAM creates a net-new asset. Save and Relate saves the asset and automatically creates a relationship between the new asset and the original parent asset. New assets are assigned a unique asset id while retaining the metadata and security from the parent asset.
NOTE: The Creative Editor requires a subscription add-on. To continue using the Creative Editor beyond the 30-day trial period, contact Customer Success to upgrade.
At-a-glance: Using Tenovos Creative Editor
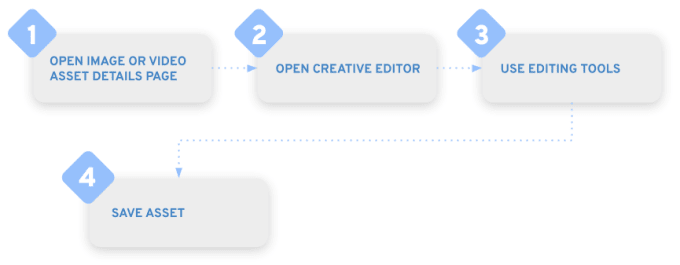
To use Tenovos Creative Editor:
- Locate the image or video in Tenovos and open its Asset Details.
- Click Edit Photo/Edit Video to open the Creative Editor.
For an overview, see: - Edit the image or video using the available global, image, or video editing tools.
- Save the new asset. Save to DAM creates a net-new asset. Save and Relate creates a new asset and a derivative relationship to the original input asset.
Getting started
This section provides an overview of the Tenovos Creative Editor. It includes overviews of using the Creative Editor to modify image and video assets, an introduction to the Creative Editor tools, a list of supported file types, and the role privilege you need to access the Creative Editor in Tenovos.
TOPICS IN THIS SECTION
- Open the Creative Editor
- Creative Editor tools
- Supported file types
- Required privileges
- Working with image assets
- Working with video assets
- Working with the video timeline
Open the Creative Editor
To open the Tenovos Creative Editor, locate the image or video in Tenovos and open its Asset Details, then click Edit Photo/Edit Video. Note: All required fields on the asset must be complete before opening an asset in the Creative Editor.
Creative Editor tools
Most of the Tenovos Creative Editor tools are available to all Tenovos-supported asset types. Options that are specific to image or video editing are noted as such. For example, image cropping presets are available for images only and video trimming is for videos only.
The toolbar options will vary depending on what you’re modifying in an asset. For example, when you first open an image asset, you’ll see options that include Adjustments and Filter. Double-clicking the asset displays manual cropping grab bars and element orientation options.
Supported file types
Tenovos Creative Editor supports standard image and video file types. This includes JPG, PNG, WebP, GIF, BMP, and SVG for images, and MP4 and MOV for videos. File types that are not supported will not display the Edit Photo or Edit Video option in their Asset Details. (If you do not have the required role privilege, you will not see those options regardless of the asset file type.)
For image assets, you can choose to save them as JPG files or PNG files, depending on whether you need to maintain transparency. Video assets are saved as mp4 files.
Required privileges
To access the Tenovos Creative Editor, users must have the Creative Editor role privilege.
Working with image assets
When you open the Tenovos Creative Editor for an image asset, the left column displays the cropping and text overlay tools. The tool bar above the image, includes the editing tools of Adjustments, Filter, Effect, and Blur. Additional tools will be available based on what you’re modifying in an asset.
Most of the Tenovos Creative Editor tools are available to all supported asset types. Options that are specific to images or videos are listed in Image editing tools and Video editing tools. For example, image cropping presets are available for image files only and video trimming is for video files only.
For information about the tools you can use to edit images see:
Tenovos Creative Editor for an image asset:

Working with video assets
When you open the Tenovos Creative Editor for a video asset, the left column displays the text overlay tool. Clicking the video asset displays a toolbar with additional editing tools, including Trim, Volume, Crop, Adjustments, Filter, Effect, and Blur.
Beneath the video asset is the timeline—the primary area for video editing. This is where you can position the video clips and text overlays in relation to time. The timeline has two sections: the foreground which displays the text overlay clips you add, and the lower background clip which defines the video duration.
For information about the tools you can use to edit videos see:
Tenovos Creative Editor for a video asset:

Working with the video timeline
Beneath a video asset in the Creative Editor is the timeline—the primary area for video editing. This is where you can position the video clips and text overlays in relation to time. The timeline has two sections: the foreground which displays the text overlay clips you add, and the lower background clip which defines the video duration.
TOPICS IN THIS SECTION
- About the timeline toolbar
- Adjusting the timeline display
- Timeline foreground clips
- Timeline background clip
About the timeline toolbar
Options on the timeline toolbar include:
- Background. The fill color of any exposed background area when you crop a video.
- Split Clip. Divide the clip at the seeker location. For text overlay "clips," the original text is duplicated in the new divided one.
- Play/Pause Complete Video. Preview the video in its entirety—not just the selected clip—or pause the video in progress.
- Disable/Enable Loop. Stop or start the video from playing on repeat.
- Timeline Scale. Zoom controls let you reduce or enlarge the displayed timeline scale for more precise editing.
- Fit View. Reduce or expand the timeline scale to fit the viewing area.
- Collapse/Expand timeline. Display or hide the timeline from view.
Adjusting the timeline display
Beneath a video asset in the Creative Editor is the timeline—the primary area for video editing. Options in the timeline toolbar allow you to adjust the display area.
- Timeline Scale. Reduce or enlarge the displayed timeline scale.
- Fit View. Reduce or expand the timeline scale to fit the viewing area.
- Collapse/Expand timeline. Hide the timeline from view or display it.
Timeline foreground clips
The foreground timeline displays the text overlays that you add to the original video. In addition to the timeline toolbar options, the context menu on a text overlay clip allows you to arrange it via Bring Forward and Send Backward, and Delete it.
- To adjust start and end time of a text overlay clip, drag either of the strip handles to the preferred time.
- To divide a clip into two at the seeker's position, use Split Clip. The original text is duplicated in the new divided one.
- To position a text overlay clip, drag the center of its strip to the new location.
- To rearrange the text clips, drag the center of a strip to the preferred location.
Timeline background clip
The video asset is the "background clip" at the bottom of the timeline. It defines the duration of the video. In addition to the timeline toolbar options, the context menu on a background clip allows you to arrange it via Move Left and Move Right, Set as Overlay, Mute it, Trim it, or Delete it.
A background clip includes a context menu with the following options.
- Move Left. Move the clip to the left of the preceding clip.
- Move Right. Move the clip to the right of the following clip.
- Set as Overlay. Move the clip to the foreground clips section and set it as an overlay.
- Mute. Silence the audio track associated with the selected clip.
- Trim. Remove the selected section of the video.
- Delete. Delete the selected clip.
Saving edited assets
When saving edited assets, you have a maximum of four options: Save to DAM, Save and Relate, Save as New Version and Save to Local Storage. The save options available for a given user are backed by Role Based Access Control and may vary based on the end user's role and asset-level permissions.
For image assets, you can choose to save them as JPG files or PNG files, depending on whether you need to maintain transparency. Video assets are saved as mp4 files.
TOPICS IN THIS SECTION
Save to DAM
Save to DAM uploads an edited asset as a new asset in Tenovos, complete with a unique asset ID but preserving the metadata from the input asset.
To Save to DAM:
- When you have completed your image or video asset edits, click Save to DAM. The Save file to DAM dialog box opens.
- Leave the original file name or enter a new one.
For image assets, you can choose to save them as JPG files or PNG files, depending on whether you need to maintain transparency. Video assets are saved as mp4 files. - Click Save. The edited asset is added to Tenovos as a new asset.
Save and Relate
Save and Relate saves the image or video asset and automatically creates a derivative relationship to the original input asset. It is assigned a unique asset id while retaining the metadata from the parent asset.
To Save and Relate an edited asset:
- When you have completed your image or video asset edits, click Save and Relate. The Save and Relate dialog box opens.
- Leave the original file name or enter a new one.
For image assets, you can choose to save them as JPG files or PNG files, depending on whether you need to maintain transparency. Video assets are saved as mp4 files. - Click Save. The edited asset is added to Tenovos as a new asset with a child derivative relationship to the original input asset.
Save as New Version
Save as New Version uploads an edited new version to the asset the creative editor was opened from.
To Save as New Version:
- When you have completed your image or video asset edits, click Save as New Version. The Save as New Version dialog box opens.
- Leave the original file name or enter a new one.
For image assets, you can choose to save them as JPG files or PNG files, depending on whether you need to maintain transparency. Video assets are saved as mp4 files. - Click Save. The edited asset is added to Tenovos as a new version of the asset the creative editor was opened from.
Save to Local Storage
Save to Local Storage uploads an edited asset as a new asset in Tenovos, complete with a unique asset ID but preserving the metadata from the input asset.
To Save to Local Storage:
- When you have completed your image or video asset edits, click Save to Local Storage. The Save to Local Storage dialog box opens.
- Leave the original file name or enter a new one.
For image assets, you can choose to save them as JPG files or PNG files, depending on whether you need to maintain transparency. Video assets are saved as mp4 files. - Click Save. The edited asset will download to your machine.
Image editing tools
The following editing option is available exclusively to image assets.
Crop to preset formats
Preset cropping formats allow you to quickly generate size variations of your image assets. Tenovos provides formats for common aspect ratios, social media and print. Social media formats are available for Instagram, Facebook, and X. Preset print formats include Postcard, Business Card, Poster, Flyer, and Brochure.
This feature is available exclusively for image assets.
To crop an image to a preset format:
- Open the image Asset Details. Then click Edit Photo to open the Creative Editor.
- In the left column, click Crop. The preset format options are displayed.
- Choose a Social or Print format, then save the asset.
Video editing tools
When you open Tenovos Creative Editor for a video asset, the left column displays the text overlay tool. Clicking the video asset displays a toolbar with additional editing tools.
Beneath the video asset is the timeline—the main area for video editing. This is where you can position clips and text overlays in relation to time and access additional video editing options, including modifying the background fill and splitting the clip.
TOPICS IN THIS SECTION
Trim a video clip
You can trim video clips directly on the timeline or use the Trim control in the Creative Editor toolbar.
- To use the Creative Editor toolbar, select the clip in the timeline, click Trim, then grab either end of the background clip and drag it to the preferred start or end time.
- To use the timeline, select the clip, then grab either end of the background clip and drag it to the preferred start or end time.
Split a video clip
To split a video clip, move the timeline seeker to the point where you want to divide the clip. Then click Split Clip. The clip is separated but remains in its original location in the timeline.
Fill video background
You can crop a video asset and then adjust the canvas background color.
- To use the Creative Editor toolbar, click the video. Then choose Color in the toolbar to open the background color options column and select a color.
- To use the timeline toolbar, click Background to open the color options column and select a color.
Arrange video elements
When editing videos, you can specify the position of text overlays and the video, relative to the page.
To arrange video elements:
- Select one or more video asset elements.
- On the Creative Editor toolbar, open the Position menu located in the top right-hand corner.
- Choose an alignment or distribution option. The options available to you are determined by the number of elements you have selected.
- Align Elements: Left, Centered, Right, Top, Middle, Bottom.
This option is available when you select multiple elements. They are aligned to each other. - Move: Bring to Front, Bring Forward, Send Backward, Send to Back, Fixed to Front, Fixed to Back.
This option is available when you select a single element. - Align to Page: Left, Centered, Right, Top, Middle, Bottom.
This option is available when you select a single element. It is aligned relative to the page.
- Align Elements: Left, Centered, Right, Top, Middle, Bottom.
Combine elements
Combining elements allows you to create a new block with a customized shape. When editing video assets, there are four combination options: Union, Subtract, Intersect, and Exclude.
To combine elements:
-
Press and hold the Shift key, then select two one or more elements in the video asset. The Combine option appears in the Creative Editor tool bar.
-
Click Combine to open its menu. Options are.
- Union. Combines all block shapes into one. The resulting block’s fill will be a duplicate of the top-most block’s fill.
- Subtract. Removes from the bottom-most block, the shapes of the other blocks that overlap it. The resulting block will be a duplicate of the bottom-most block’s fill.
- Intersect. Keeps only the overlapping parts of all the block shapes. The resulting block’s fill will be a duplicate of the top-most block’s fill.
- Exclude. Removes the overlapping parts of all the block shapes. The resulting block’s fill will be a duplicate of the top-most block’s fill.
Global editing tools
The tools in this section are available to both images and videos.
TOPICS IN THIS SECTION
- Adjustments
- Blend mode
- Blurring
- Crop to manual selection
- Effects
- Filters
- Orientation
- Text overlays
- Undo/Redo changes
Adjustments
The Adjustments tool gives you multiple options for image optimization and post-processing.
- Basic options include Brightness, Saturation, Contrast, and Gamma.
- Refinements enable you to adjust image Clarity, Exposure, Shadows, Highlights, Blacks, Whites, Temperature, and Sharpness.
To adjust image colors and tones:
- Open the image or video Asset Details. Then click Edit Photo/Edit Video to open the Creative Editor.
- In the toolbar, click Adjustments to open its options on the left.
(For videos, click the asset to display the toolbar.) - Use the sliders to optimize the Basic and Refinements options.
- Basic options include Brightness, Saturation, Contrast, Gama.
- Refinements options include Clarity, Exposure, Shadows, Highlights, Blacks, Whites, Temperature, Sharpness.
Blend mode
You can apply blend modes to the text overlays that you add to a video or image asset. Each blend mode has distinct characteristics, adding a unique effect to the final composition. The Blend mode is accessed via the Creative Editor toolbar's context menu. Clicking that option displays the available blend modes, grouped by the overall effect they have on an image, including darkening, lightening, and adjusting contrast and saturation.
To apply a blend mode to a text overlay:
-
Add the text overlay to the video or image asset.
-
In the Creative Editor toolbar, open the More Options and select a Blend Mode. Blend modes are grouped based on their main outcome—Normal, Darker, Lighter, Contrast, Color, and Comparative. Normal Default mode. Leaves layer as-is.
Darker
Darker blend modes are ideal for working with shadows or dark base layers. They can help you create more realistic and dynamic shadow effects or add depth and texture to an image.
- Darken. Preserves the darkest colors between the blend layer and the base layer. Compares the color values of overlapping pixels in the two layers and keeps the darker value. This can make an image appear darker when using a color, photo, or gradient overlay. Darken can also make whites transparent, making them invisible in the image.
- Multiply. Retains only the darker colors from the blend layer and reduces the opacity of lighter colors to create a darker composite image. The resulting color is always darker, except where it is pure white.
Multiplying with black as the blend color will result in black, while multiplying with white will leave the image unchanged. - Color Burn. Darkens the base layer of an image using colors from the blend layer, increasing contrast between the two. Blending with white results in no change.
Lighter
These blend modes are useful for enhancing light colors in your images.
- Lighten. Compares the base and blending layer colors and keeps the lighter color.
- Screen. Retains only the white and lighter colors from the blend layer while reducing the opacity of black or dark colors.
Any area of the layer that is pure black will become transparent. Areas that are pure white will be unchanged, and shades of gray between pure black and pure white will become lighter. - Color Dodge. Uses the colors from the blend layer to lighten the base layer, which reduces the contrast between the two---the brighter the top layer, the more its color impacts the bottom layer. Blending any color with white results in white, while blending with black leaves the image unchanged.
Contrast
Contrast blend modes focus on how the base and blend layers interact with each other. They are useful for adding depth to your images.
- Overlay. Both lightens and darkens an image at the same time and increases contrast. Works like Multiply if the base layer is darker, or like Screen if it’s lighter.
- Soft Light. Lightens or darkens colors based on the brightness of the blend color.
- Hard Light. Combines the brightness values of the top layer with the Multiply and Screen blend modes to impact the interaction between the blend layer and the base layer.
Color
These blend modes are useful for photo editing.
-
Hue. Replaces the base color’s hue value with the blend color’s hue value, while maintaining the base color’s saturation and brightness. This mode can only be used on images with color in them, not black and white images.
-
Saturation. Uses the blend layer’s saturation levels and keeps the hue and brightness of the base layer.
-
Color. Uses the blend layer’s hue and saturation and keeps the brightness of the base layer.
-
Luminosity. Uses the base layer’s brightness while maintaining the hue and saturation of the base layer. This creates the inverse effect of the Color blend mode.
Comparative
Comparative blend modes invert white or light colors. They are useful for creating subtle layered effects or inverting colors.
- Difference. Subtracts the blend color from the base color, or vice versa, depending on which is brighter. If two pixels are identical, the result will be black.
- Exclusion. Behaves like Difference, but with less contrast between the layers as it does not invert mid-tones.
Blurring
Blur options soften an image or video and reduce noise. There are four blur options, each with related options that you can adjust.
-
Gaussian Blur. Blurs the whole image with the specified intensity from 0 to 100. The default is 50.
-
Linear Blur. Blurs the specified focal strip in an image with the specified intensity from 0 to 100. The default is 30.
- Intensity
- Point 1 – X
- Point 2 – X
- Point 1 – YPoint 2 - Y
-
Mirrored Blur. Blur a mirrored image.
- Intensity
- Size of Gradient
- Size of non-blurred Area
- Point 1 – X
- Point 2 – X
- Point 1 – Y
- Point 2 - Y
-
Radial Blur. Creates a circular motion blur effect, giving the impression that the image is rotating around its central point.
- Intensity
- Size of Gradient
- Size of non-blurred Area
- Point X
- Point Y
To apply a blur option:
- Open the image or video Asset Details. Then click Edit Photo/Edit Video to open the Creative Editor.
- In the toolbar, click Blur to open its options on the left.
(For videos, click the asset to display the toolbar.) - Click a blur option to apply it and then adjust its settings as necessary.
Crop to manual selection
Crop in the Creative Editor toolbar allows you to manually select the cropped area. To access the manual crop option, double-click the image or video.
- For images, you can also use Crop in the left column to display the cropping screen.
- For videos, Crop is available in the Creative Editor toolbar.
To crop an image or video:
- Open the image or video Asset Details. Then click Edit Photo/Edit Video to open the Creative Editor.
- Double-click the image to display the cropping screen.
NOTE: This screen is also where you can adjust the display orientation. - Drag the edge handles to frame the image area you want to keep.
- Click Done.
Effects
Effects transform your images and videos by adding artistic flair, creating textured patterns, or enhancing their appearance. After you apply an effect, you can adjust its settings. The setting options vary based on the applied effect.
- Pixelize: Horizontal Count, Vertical Count.
- Radial Pixel: Radius per Row, Size per Row.
- Cross Cut: Horizontal Offset, Horizontal Cuts, Vertical Offset, Variation.
- Liquid: Intensity, Scale, Variation.
- Outliner: Intensity, Blending.
- Dot Pattern: Global Blur, Number of Dots, Size of Dots.
- Posterize: Number of Levels.
- TV Glitch: Rough Distortion, Fine Distortion, Vertical Offset, Variance.
- Half Tone: Angle of Pattern, Scale of Pattern.
- Linocut: Scale of Pattern.
- Shifter: Distance, Shift Direction.
- Mirror: Mirrored Side.
- Glow: Intensity, Darkening, Bloom.
- Vignette: Color, Size.
- Tiltshift: Intensity, Position.
- Extrude Blur: Intensity.
- Sharpie: N/a.
- Recolor: Source Color, Color Match, Brightness Match, Smoothness, Target Color.
- Green Screen: Source Color, Color Match, Smoothness, Spill
To apply an effect:
-
Open the image or video Asset Details. Then click Edit Photo/Edit Video to open the Creative Editor.
-
In the toolbar, click Effect to open its options on the left.
(For videos, click the asset to display the toolbar.) -
Click an effect to apply it and then adjust its settings as necessary.
Filters
Filters apply overlays that change asset colors and shading. The Tenovos Creative Editor offers more than 60 filters, encompassing a wide range of modern styles and moods. Some examples include “Deep Blue,” “Greyed,” “Sepia,” and “Creamy.” You can only apply one filter to an image.
To apply a filter:
-
Open the image or video Asset Details. Then click Edit Photo/Edit Video to open the Creative Editor.
-
In the toolbar, click Filter to open its options on the left.
(For videos, click the asset to display the toolbar.) -
Click a filter to apply it and then adjust its Intensity as necessary.
Orientation
You can adjust the orientation of image and video assets by straightening, rotating or flipping it horizontally or vertically.
To adjust asset orientation:
-
Open the image or video Asset Details. Then click Edit Photo/Edit Video to open the Creative Editor.
-
Double-click the image or video to display the orientation options. Then choose from the following:
- Straighten. Use the slider to adjust the element tilt or slant.
- Rotate. Turn the element 90 degrees counterclockwise.
- Mirror horizontally. Flip the element horizontally. This swaps the left and right sides of the element.
- Mirror vertically. Flip the element vertically. This swaps the top and bottom parts of the element.
-
Click Done.
-
Continue editing the asset or save it.
Text overlays
Text overlays are added on top of an image or video asset. Tenovos provides pre-defined formats of Title, Headline, and Paragraph in the Roboto font, each in a different font size.
After you add your text, you can customize its formatting using the text element or Creative Editor toolbars.
TOPICS IN THIS SECTION
- Add a text overlay
- Edit a text overlay
- Format text overlays
- Add a text stroke
- Add a text shadow
- Adjust text opacity
- Arrange text elements
- Rotate a text overlay
- Move a text overlay
- Copy and paste text overlays
- Delete text elements
Add a text overlay
To add a text overlay:
-
Open the image or video Asset Details. Then click Edit Photo or Edit Video to open the Creative Editor.
-
In the left column, click Text. The format options are displayed.
-
Click a format, either Title, Headline, or Paragraph. A text element is added to the asset.
-
In the text element, double-click the format name and replace it with your text.
Use the text element tool bar to bold, italicize, or change the selected text color. Additional formatting options are available in the Creative Editor tool bar. -
Continue modifying the asset or save it.
Edit a text overlay
To edit content in a text overlay, double-click in the text element.
Format text overlays
There are a variety of standard formatting options that are available to your text overlays. These options apply to all text in a selected text element, or only the text you have selected.
In addition to the options listed below, you can also Add a text shadow and Add a text stroke.
These format options apply to all text in a selected text element:
- Typeface. Choose from 50 fonts.
- Font size. Choose from 16 pre-set font sizes. Choosing Auto fixes the text element frame size.
- Horizontal alignment. Text aligned Left, Center, Right.
- Stroke. When you Enable Stroke, you can choose the stroke color, line width, style, position (inside, outside, or centered on the character edge), and joint corner style (mitered, beveled, or rounded). For more details, see Add a text stroke.
- Shadow. When you Enable Shadow, you can choose the Color, Angle, Distance, and Blur. For more details, see Add a text shadow.
These format options only apply to the text you specifically select:
- Bold style
- Italic style
- Fill color
To format text:
-
Select a text element or any of its contents to display text formatting options in the Creative Editor toolbar.
-
To format all text in the text element, choose from typeface, font size, horizontal alignment, stroke, and shadow.
-
To format only the text you select, choose from Bold, Italic, or a Fill color.
Add a text stroke
A text stroke adds a border around each character. You can customize the stroke color, style, position, and join style.
To add a text stroke:
-
Select the text overlay element.
-
In the toolbar, click Stroke to open its options on the left.
-
Click Enable Stroke to access the stroke options.
-
Adjust the stroke options:
-
Color. Choose from the Document Colors or Default Colors. Or click the color selection box to specify a custom RGB or CMYK color
-
Line width. Change the stroke width.
-
Style. Choose a stroke style of Solid, Dashed, Dashed Round, Long Dashed, Long Dashed Round, or Dotted.
-
Position. Choose the stroke location. Either inside, outside, or centered on the image edge.
-
Join style. Set the style for the stroke corners. Either Miter, Bevel, or Round
-
-
Continue editing the asset or save it.
Add a text shadow
You can add a shadow to text in a text overlay then adjust its Color, Angle, Distance, and Blur.
To add a shadow to text in a text overlay:
-
Select the text overlay element.
-
In the toolbar, click Shadow to open its options on the left.
-
Click Enable Shadow to access its options.
- Color. Click the Color field to select a default color or one from the image. Or click Edit to specify a custom RGB or CMYK color (to return to the shadow Color options, click the Back icon next to Edit Color). Click the X to close the Color options and return to the Shadow settings.
- Angle. Sets the shadow location relative to the image. Enter a value and/or click the Rotate button to rotate the shade clockwise in 45 degree increments
- Distance. The shadow offset in pixels. Enter a value to change the shadow distance. Note that if the distance setting is too low, the shadow won’t be visible.
- Blur. The width of the edge blurring in pixels.
-
Continue editing the asset or save it.
Adjust text opacity
You can adjust the opacity of text elements, from zero to 100. An opacity of zero makes the text completely transparent and invisible. An opacity of 100% makes the text completely visible; it is not transparent at all.
To adjust the opacity of a text overlay element:
- Select the text overlay element.
- In the Creative Editor toolbar, open the More Options menu and move the Opacity slider to the desired setting, from zero to 100. To enter a number manually, click the Opacity field edit icon.
Arrange text elements
When editing video assets, you can select text overlays and specify their position relative to the page.
NOTE: This option is not available when editing images.
To arrange text elements:
-
Select a text overlay element.
-
On the Creative Editor toolbar, open the Position menu located in the top right-hand corner.
-
Choose an alignment or distribution option. The options available to you are determined by the number of elements you have selected.
- Align Elements: Left, Centered, Right, Top, Middle, Bottom.
This option is available when you select multiple elements. They are aligned to each other. - Move: Bring to Front, Bring Forward, Send Backward, Send to Back, Fixed to Front, Fixed to Back.
This option is available when you select a single element. - Align to Page: Left, Centered, Right, Top, Middle, Bottom.
This option is available when you select a single element. It is aligned relative to the page.
- Align Elements: Left, Centered, Right, Top, Middle, Bottom.
Rotate a text overlay
To rotate the text element, select it, then click and hold its Rotate button and use your mouse to move it to a new orientation.
Move a text overlay
To move a text element, select it, then click and hold its Move button and drag it to the new location.
Copy and paste text overlays
When editing assets in the Tenovos Creative Editor, you can copy and paste the text elements you add.
To copy and paste elements:
- Select one or more text elements.
NOTE: To select multiple elements, press and hold the Shift key. - In the main toolbar, open the More Options menu and select Copy Element.
- Then select Paste Element to place the copied element(s).
Delete text elements
To delete a text element:
Select the text element, then click its Delete icon. (To cancel the deletion, click Undo.)
The option to Delete is also available on the text overlay clip's context menu (three dots) in the timeline.
Undo/Redo changes
When working with image and videos, you can Undo or Redo your changes. The Undo and Redo buttons are in the top left corner of the Creative Editor.