Tenovos Story Link
The Tenovos Story Link for Adobe Creative Cloud extension allows you to search, view, retrieve, and save assets from your Adobe Creative Cloud application to the Tenovos digital asset management system (DAM). It connects your DAM, the creative software your teams use to create content, and the distribution channels for that content such as websites, eCommerce, and social media.
This document explains how to install, configure, and use Tenovos Story Link as an extension of the following Adobe Creative Cloud applications:
- Adobe InDesign
- Adobe Illustrator
- Adobe Photoshop
Installing Tenovos Story Link
This section presents the installation prerequisites, explains where to find the Tenovos Story Link installer, and walks you through the steps to install Story Link on a macOS or Windows computer.
Prerequisites
Before installing the Tenovos Story Link extension, one or more of the following Adobe Creative Cloud applications must be installed:
- Adobe InDesign
- Adobe Illustrator
- Adobe Photoshop
Download the Tenovos Story Link installation files
To install Tenovos Story Link, you need both the Story Link Installer and the Extension package file. The Installer runs the installation scripts that deploy the Story Link Extension.
-
Open the Tenovos Story Link installation page in a web browser. (The URL is https://extensions.tenovos.io/storylink/index.html#/installers.)
-
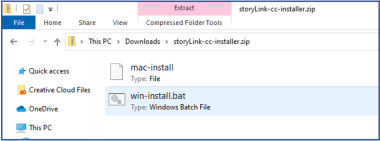
Click the Installer icons to download the installation file. This a ZIP package (storyLink-cc-installer.zip) that includes installation scripts for MacOS and Windows.
-
Download the Story Link Extension. Get the latest release or choose an earlier version of the package from the list.
NOTE: By default, downloads are placed in the Downloads directory on your computer. If your browser is configured to download to a different location, move the ZXP package to the Downloads directory.
Install Tenovos Story Link
INSTALL STORY LINK ON macOS
To install Tenovos Story Link on macOS:
-
Confirm that the extension package file (ZXP) for the version you selected is downloaded and is available in your Downloads directory.
-
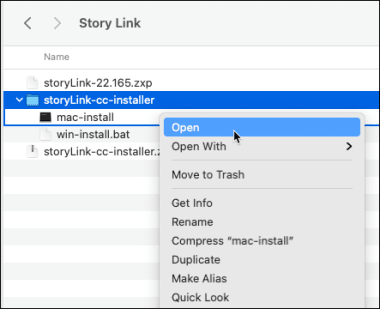
Open the installation file (ZIP) and run the mac-install script to deploy the Story Link extension.
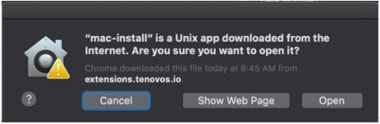
NOTE: When you double-click the script to run it for the first time, you may see the following messages from the operating system:
-
“mac-install” is a Unix app downloaded from the Internet. Are you sure you want to open it?
Click Open to continue the installation.
-
“mac-install” cannot be opened because it is from an unidentified developer:
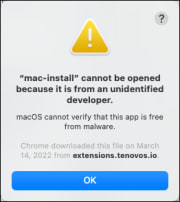
Instead of double-clicking the installer icon, control-click the icon, then choose Open from the shortcut menu.
A confirmation prompt appears.
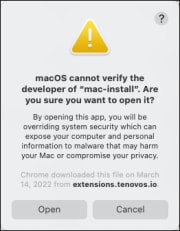
Click Open to continue the installation.
-
-
The installer runs and the Terminal window opens.

At the Password prompt, enter your computer’s Admin password and press Return.
NOTE: The key icon indicates that your input is hidden. Type your password, then press Return.
-
When the installation script ends, the extension is deployed, as indicated by the message “Story Link Deployed.”
Confirm that the Using Package line displays the version you expected.

INSTALL STORY LINK ON WINDOWS
-
Confirm that the extension package file (ZXP) for the version you selected is downloaded and is available in your Downloads directory.
-
Open the installation file (ZIP) and run the win-install.bat script to deploy the Story Link extension.
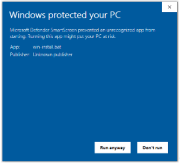
NOTE: When running the script for the first time, you may see a message from the operating system. Click Run anyway to continue.
-
The installer runs. When the installation script ends, the extension is deployed, as indicated by the message “Story Link Deployed.”

Create a Tenovos Story Link profile
To access your assets in the Tenovos DAM directly from your Adobe Creative Cloud application, you must create a Tenovos Story Link profile. This profile includes the login credentials and the DAM server connection details, as provided by your Tenovos administrator.
You can create a Story Link profile with one of three authentication methods—Login, MFA, or SSO.
The information you must provide will differ based on the authentication method you choose. All three require that you specify a name for the profile (the “Profile Name”), which can be anything you want.
-
Login authentication method. To login, enter a Profile Name, User Name, and Password.
-
MFA authentication method. To login, enter a Profile Name. Multi-factor authentication (MFA) requires two or more methods of authentication. To access Tenovos, you must provide login credentials and a login code from a different device.
-
SSO authentication method. To login, enter a Profile Name and Cognito Provider Name. Single sign-on (SSO) allows you to use a single set of credentials to authenticate securely within multiple applications.
NOTE: The Cognito Provider Name is provided by Tenovos. Please contact Tenovos Customer Success for this information.
To create a Story Link profile:
-
Open your Adobe Creative Cloud application—either Adobe Illustrator, Adobe InDesign, or Adobe Photoshop.
-
In the Adobe application, select Window > Extensions > Story Link. The Story Link window appears.

NOTE: If are using an M1/M2 Mac and you do not see the Story Link extension, enable Rosetta 2. For more information about Rosetta, see your Apple documentation.
-
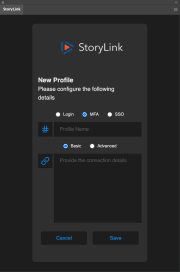
Click New Profile to create a profile.
The New Profile window appears with three authentication options—Login, MFA, and SSO. The Login option is selected by default.
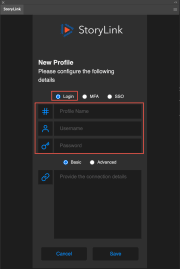
-
For the Story Link connection profile, choose one of three authentication methods—Login, MFA, or SSO—for connecting to Tenovos.
The information you must provide will differ based on the authentication method you choose. All three require that you specify a name for the profile (the “Profile Name”), which can be anything you want.
-
Login authentication method. Enter a Profile Name, User Name, and Password.
-
MFA authentication method. Enter a Profile Name.
Multi-factor authentication (MFA) requires two or more methods of authentication. To access Tenovos, you must provide login credentials and a login code from a different device.
- SSO authentication method. Enter a Profile Name and Cognito Provider Name.
Single sign-on (SSO) allows you to use a single set of credentials to authenticate securely within multiple applications.

-
-
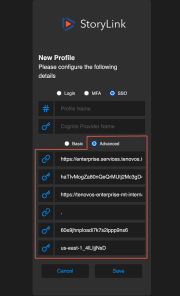
Enter the Basic or Advanced connection details, as provided by your Tenovos administrator.
-
Basic connection details. Enter the connection string in the text box. Entering the connection string automatically populates the parameters in the Advanced details.
NOTE: The connection string is provided by Tenovos. Please contact Tenovos Customer Success for this information.
Basic connection details for Login:
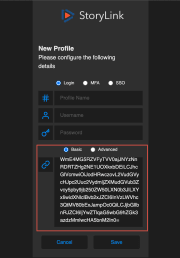
Basic connection details for MFA:

Basic connection details for SSO:

-
Advanced connection details. Provide the connection parameters individually. In order, they are: API Base URL, API Key, Cognito URL, Content URL, Client ID, and User Pool ID.
After you provide the values, Story Link automatically generates the connection string for the Basic details.
Advanced connection details for Login:

Advanced connection details for MFA:

Advanced connection details for SSO:
-
-
Click Save to create the profile with the entered parameters.
A notification message appears stating that the “Profile has been saved” and the new profile is added to the list of available profiles.
Open Tenovos Story Link
To open Tenovos Story Link:
-
Open your Adobe Creative Cloud application—either Adobe InDesign, Adobe Illustrator, or Adobe Photoshop.
-
In the Adobe application, navigate to Window > Extensions > Story Link. The Story Link connection window appears.
-
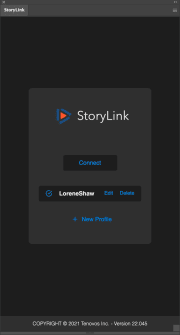
Select a profile and click Connect. This profile includes the login credentials and the DAM server connection details, as provided by your Tenovos administrator.
NOTE: For instructions on creating a Story Link profile, see Create a Story Link profile.
Story Link profiles are configured with one of three authentication options, which determine your connection process. The options are Login, MFA, or SSO:
-
Connect with the Login option. After you click Connect in the Story Link connection window, you are connected to Tenovos and Story Link displays your assets in gallery view.
-
Connect with Multi Factor Authentication (MFA). After you click Connect in the Story Link connection window, your browser displays a separate authentication window.
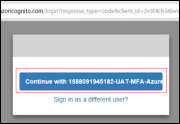
A. Click Continue with <Azure account ID>. The browser screen updates and states “You have been granted access. Click below to validate the authorization code.”

B. Copy the authorization code, enter it in the Story Link validation window, then click Validate. A message appears stating that “You can now continue to use Story Link.”
C. Click Continue. You are connected to Tenovos, and Story Link displays your assets in gallery view.
Story Link validation screen:

Story Link “Continue” screen:

Story Link home page:
-
Connect with the SSO option. After you click Connect in the Story Link connection window, your browser displays a separate authentication screening that states “You have been granted access. Click below to validate the authorization code.”

A. Copy the authorization code, enter it in the Story Link validation window, then click Validate. A message appears stating that “You can now continue to use Story Link.”
B. Click Continue. You are connected to Tenovos, and Story Link displays your assets in gallery view.
Story Link validation screen:
Story Link “Continue” screen:
Story Link home page:
-
About the Story Link workspace
This topic presents the options available to you on the Story Link Assets page.

Story Link asset views
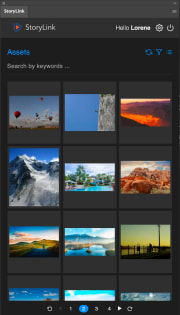
You can view Tenovos asset previews in either Gallery View or List View.
To toggle between the asset views, click Gallery View or List View in the Story Link toolbar.
ASSET PREVIEWS
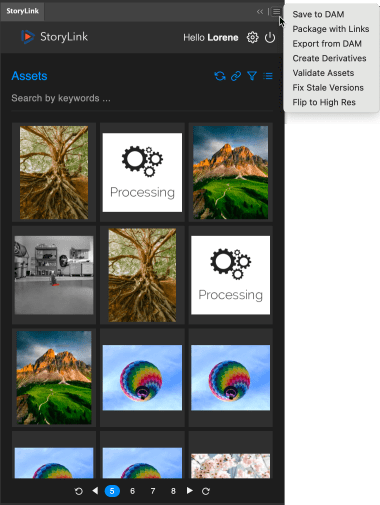
Tenovos Story Link displays thumbnail previews of all assets with a previewable image. Assets that do not have a preview image are assigned a generic system-generated thumbnail.
If Story Link is in the process of generating a preview, that asset displays a placeholder “Processing” thumbnail. When processing is complete, the placeholder thumbnail is replaced by the asset preview.
Asset preview processing thumbnail:

GALLERY VIEW
Gallery view is the default asset view in Story Link. When you log in, asset previews are displayed in gallery format.
LIST VIEW
In the toolbar, click List View to display the Tenovos assets in a list with the following information for each one:
- Thumbnail preview
- Filename
- User who last modified the asset.
System Metadata = Last Updated By - Date asset was uploaded to Tenovos. System Metadata = Created Date
Story Link Quick Start
-
To open an individual asset, right-click that asset.
-
To place a linked asset in an open document, click the asset. The asset is added to the document and its details are added to the Links panel.
-
To embed an asset in an open document, drag-and-drop it from Story Link to the document. The asset is added without a link that preserves the source information.
-
To view information about all linked assets for the currently open asset, click Links in the toolbar.
Configure Tenovos Story Link Settings
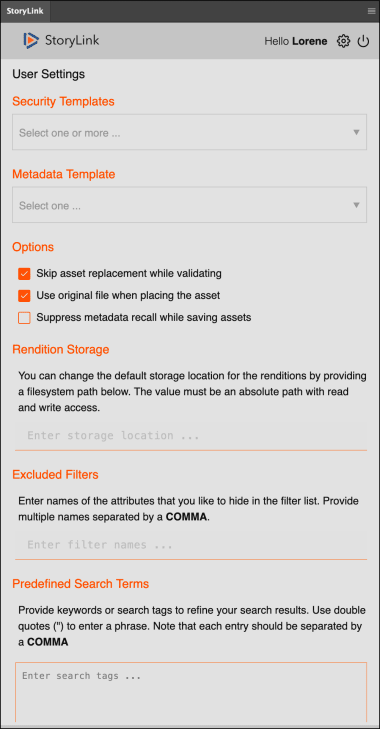
Use the Story Link Settings screen to set the default Security and Metadata Templates that are applied to the assets you save to Tenovos.
You can also set:
- Asset Options. Default settings applied to the assets you validate, place, and save.
- Rendition Storage. Default location for asset renditions.
- Excluded Filters. Attributes that are hidden in the filter list.
- Predefined Search Terms. Keywords or search tags that refine your search results.
- Themes. The Story Link color scheme.
To configure the Story Link default settings:
-
In the Story Link title bar, click Settings. The Story Link Settings screen opens.
-
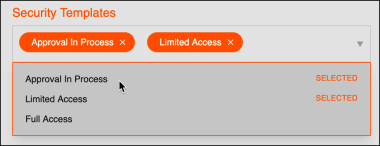
Select the default Security Templates that are applied to the assets you save to Tenovos. Security Templates determine the user access that is applied to the asset(s).
You can select multiple default Security Templates.
-
Select the default Metadata Template to apply to assets.
A Metadata Template is a pre-defined group of attributes. You can only select one Metadata Template.

-
Select the default Options for the assets you are working with:
- Skip asset replacement while validating
- Use original file when placing the asset
- Suppress metadata recall while saving assets

-
Specify the default Rendition Storage location for asset renditions.
Enter the absolute file system path—the path should have read and write access.
NOTE: The path should be the folder location and not a file path.

-
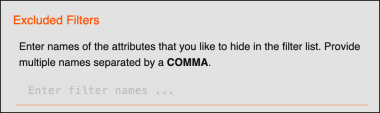
Enter the Excluded Filters—the names of attributes you want hidden in the filter list. Use a comma to separate multiple names.
-
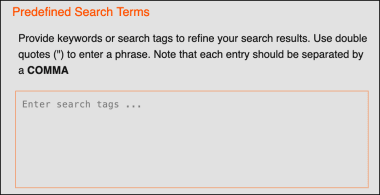
Specify the Predefined Search Terms. Enter keywords or search tags to refine your search results.
- Use double quotes (“) to enter a phrase.
- Separate each entry with a comma.
-
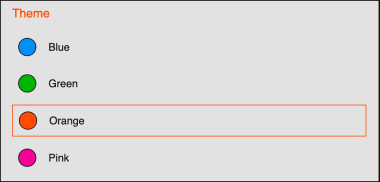
In the Theme section, select the color scheme for your Story Link application. Options are:
- Blue. Blue color scheme, dark background.
- Green. Green color scheme, dark background.
- Orange. Orange color scheme, light background.
- Pink. Pink color scheme, light background.
-
Save your changes to the Tenovos Story Link settings. Tenovos updates your settings and you are returned to the Story Link home page.
Or click Cancel to close the Settings screen and return to the Story Link home page without saving any changes.
Using Tenovos Story Link
This section explains the various tasks you can complete with Tenovos Story Link. This includes how to search, view, retrieve, and save assets from your Adobe Creative Cloud application to the Tenovos digital asset management system (DAM).
Searching for assets
To locate specific assets, you can conduct a simple search or apply filters. A simple search begins with no assets and adds to a list of results based on the criteria you specify. Filtering starts with the full set of assets available to you and eliminates assets from that set based on the attributes in the filter(s) you apply.
CONDUCT A SIMPLE SEARCH
A simple search begins with no assets and adds to a list of results based on the criteria you specify. You can apply a simple search in conjunction with filters.
The assets returned to simple search queries are based on your permissions and the asset permissions. You will only see the assets you have permission to see. Additionally, the asset permissions determine the functions you can perform on those assets.
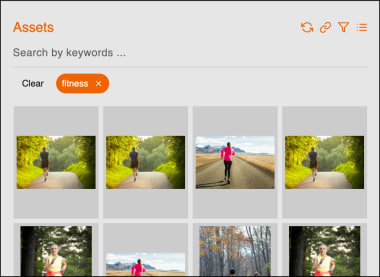
On the Assets page, use the Search by keywords text box to perform a simple search.
To conduct a simple search:
-
In the Search by keywords text box, enter the keywords then press Return. Tenovos applies the search criteria, and the asset display is updated.
Only those assets which meet the specified criteria and that you are permitted to view are returned.
-
Continue adding criteria, as necessary.
- To remove an individual search criterion, click the X next to it. That criterion is removed, and the asset display is updated based on the remaining criteria, if any.
- To remove all the search criteria tags at once, click the Clear button. All criteria tags are removed, and the asset display is updated.
-
Close the Filters panel by clicking anywhere in Tenovos Story Link outside of the Filters panel.
APPLY SEARCH FILTERS
Filtering starts with the full set of assets available to you and eliminates assets from that set based on the attributes in the filter(s) you apply. You can apply filters in conjunction with a simple search.
To apply a search filter:
-
In the Story Link toolbar, click Filter. The list of Filters appears.
-
Clicking an individual filter name expands the display to reveal its attribute options.
-
Each filter option displays the number of assets that apply to that filter option.

-
-
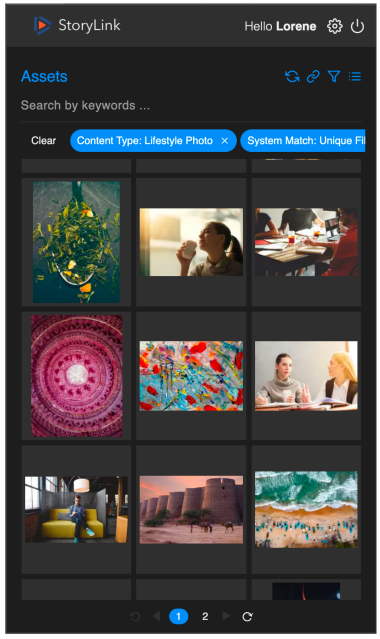
In the Filters panel, expand a filter and select one or more of its attribute options. You can apply attributes from multiple filters. Tenovos updates the Home page asset display as you make your selections.
The selected filters appear as tags in the search box. For example, the following screenshot includes the tag “Content Type: Lifestyle Photo.” “Content Type,” is the filter name and “Lifestyle Photo” filter option.
-
To remove an individual filter, click the X next to it. That filter is removed, and the asset display is updated based on remaining filters, if any.
-
To remove all the filters at once, click the Clear button. All filters are removed, and the asset display is updated.
-
-
Close the Filters panel by clicking anywhere in Tenovos Story Link outside of the Filters panel.
Open an individual asset
To open a Tenovos asset from Story Link:
-
In Story Link, right-click an asset.
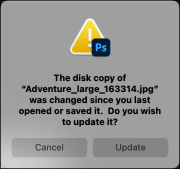
Story Link fetches the asset details, downloads the original, validates the asset, and then opens the asset file.
NOTE: If the Tenovos asset you are opening has been changed since the last time Adobe saved the file, Adobe presents the following message. Click Cancel to exit the download request, or Update to open the file.
-
Modify the asset as necessary, and then save it to Tenovos.
Place assets into an Adobe document
You can place linked or embedded assets from Story Link or your local machine into your Adobe document.
Linked assets are listed in the Links panel for both Story Link and local machine assets. If you place a linked asset that is on your local machine, Tenovos generates link information when you save the document and adds it to the Links panel.
Assets that are pasted directly into your document are embedded in that document. Those assets do not retain a connection to the original source file and are not listed in the Links panel.
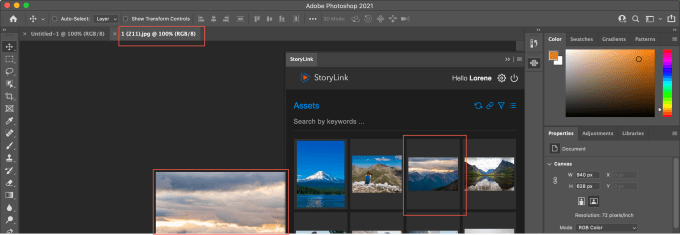
To place assets into an Adobe document:
-
Open or create a new Adobe document.
-
Place assets from Story Link or your local machine into the document.
-
To place a linked asset from Story Link, click the asset you want to add.
Story Link fetches the asset details, downloads the original, validates the asset, and then adds it to the document. You can modify it as necessary.
-
To place a linked asset from your local machine, go to File > Place and select the Linked option (in Photoshop, go to File > Placed Links). Then browse to the asset and place it in your document.
When you save the document, Tenovos generates link information. That information is available in the document’s Links panel in Story Link.
-
To embed an asset from your local machine, in your document, paste it directly into your document. The asset does not retain a connection to the original source file.
-
To embed a Tenovos asset, drag-and-drop it from Story Link into your document. The asset is embedded in the document and does not retain a connection to the source file.
-
-
Continue adding assets to your document.
View document details
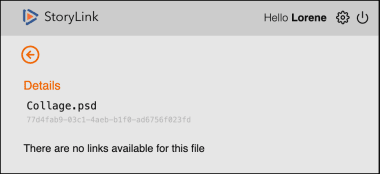
The Links panel displays document details including filename and the Tenovos object ID.
To view document details:
-
Open the asset document in Story Link.
-
In the toolbar, click the Links icon.
The Links panel opens and displays the document filename and Tenovos object ID. If the document contains asset links, those details are also available.
View asset links
You can place linked or embedded assets from Story Link or your local machine into your Adobe document.
Linked assets are listed in the Links panel for both Story Link and local machine assets. If you place a linked asset that is on your local machine, Tenovos generates link information when you save the document and adds it to the Links panel.
Assets that are pasted directly into your document are embedded in that document. Those assets do not retain a connection to the original source file and are not listed in the Links panel.
To view asset links for a document:
-
Open the asset document in Story Link.
-
In the toolbar, click the Links icon.
The Links panel opens.
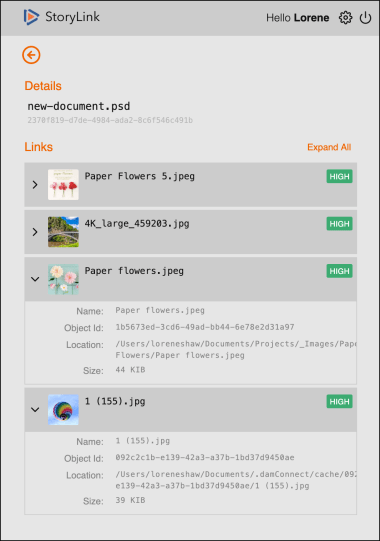
Linked assets are listed for both Story Link and local machine assets.
- Expand an asset entry to view its file Name, Object ID, Location (either in Tenovos or the local machine), and file Size.
- Indicators on the right display the resolution of the linked asset—either High (green) or Low (orange).
Saving assets to Tenovos
Use the Save to DAM option to save an Adobe file as a new asset, save a new version of an existing asset, or save a modified asset as a new asset.
SAVE AN ADOBE FILE AS A NEW ASSET IN TENOVOS
To save an Adobe file as a new asset in Tenovos:
-
Create the Adobe file.
-
In the Story Link tab, open the popup task menu and click Save to DAM.
A filename prompt from your Adobe application appears.

-
Enter the filename, then click OK.
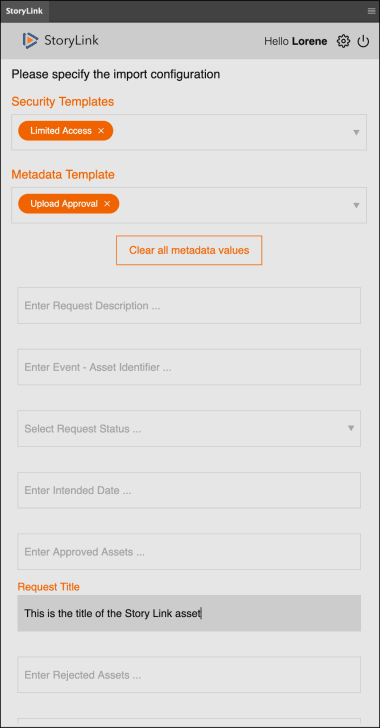
The Story Link import configuration screen is displayed. It includes the default security and metadata templates.
Import configuration screen for a new asset:
-
Provide the required information. The information that you must provide may change based on the templates applied to the document.
- Security Templates. Leave the default or choose a new one. You can select multiple security templates.
- Metadata Template. Leave the default selection or choose a new one. Only one metadata template can be applied to an asset.
- Request Title. A description of the request.
-
Provide the optional information. This will vary based on the templates applied to the document.
NOTE: To delete all values and re-enter them, click Clear all metadata values.
-
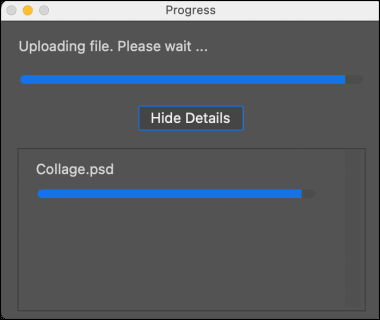
Click Continue to save the asset to Tenovos. The file is processed and then uploaded to Tenovos.
To view or hide additional information about the upload progress, click Show Details/Hide Details in the Progress window.
-
Click Refresh in the toolbar to view the asset thumbnail in Tenovos. You may see a “Processing” thumbnail if Tenovos is still processing the file.
SAVE A NEW VERSION OF AN EXISTING ASSET
To save a new version of an existing asset:
-
Open an existing asset and edit it.
-
In the Story Link tab, open the popup task menu and click Save to DAM. The import configuration panel opens.
Import configuration screen for an existing asset:

-
Edit the template and metadata entries as necessary.
NOTE: To delete all values and re-enter them, click Clear all metadata values.
-
Click Continue to save the asset to Tenovos. The file is processed and then uploaded to Tenovos.
To view or hide additional information about the upload progress, click Show Details/Hide Details in the Progress window.
-
Click Refresh in the toolbar to view the asset thumbnail in Tenovos. You may see a “Processing” thumbnail if Tenovos is still processing the file.
SAVE A MODIFIED ASSET AS A NEW ASSET
To save a modified asset as a new asset:
-
Open an existing asset and modify it.
-
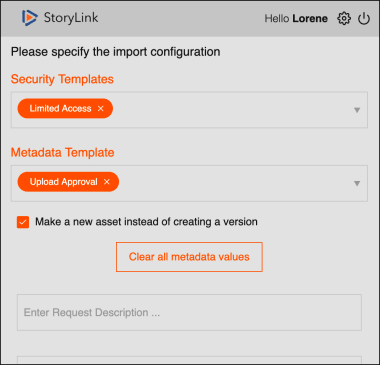
In the Story Link tab, open the popup task menu and click Save to DAM. The import configuration panel opens.
Import configuration screen for an existing asset
-
Edit the template and metadata entries as necessary.
NOTE: To delete all values and re-enter them, click Clear all metadata values.
-
Select Make a new asset instead of creating a version.
-
Click Continue to save the asset to Tenovos. The file is processed, uploaded to Tenovos, and you are returned to the Story Link workspace.
To view or hide additional information about the upload progress, click Show Details/Hide Details in the Progress window.
-
Click Refresh in the toolbar to view the asset thumbnail in Tenovos. You may see a “Processing” thumbnail if Tenovos is still processing the file.
Create an asset package with links
The Package with Links option converts a low-resolution asset document to a high-resolution asset, updates all linked assets in the document to their latest versions, and then runs the Adobe package functionality to export the document and its source files (i.e., linked assets) to a folder.
To create an asset package with links:
-
Open the Tenovos asset.
-
In the Story Link tab, open the popup task menu and click Package with Links.
The Package with Links panel opens with all low-resolution links selected for conversion to high-resolution. You can de-select any links you do not want converted.
Links that are already high-resolution cannot be selected as they do not require conversion.

-
Click Continue.
The linked low-resolution assets are converted to high-resolution, all assets are updated to their latest versions, and the Windows File Explorer or Mac Finder window opens.
Mac Finder window:
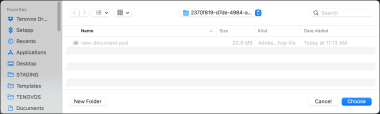
-
Specify the package location and click Choose.
The packaged asset along with linked assets is downloaded to the selected folder.
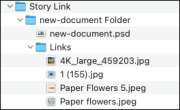
Packaged asset on a Mac:
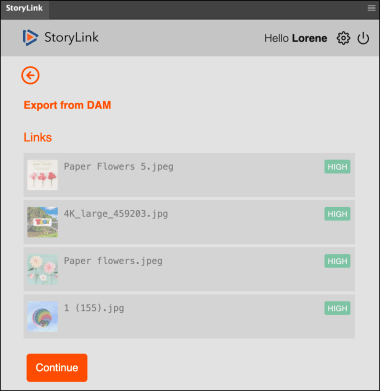
Export an asset from Tenovos
The Export from DAM option converts all linked assets in a file from low-resolution to high-resolution, updates the linked assets to their latest versions, and then runs the Adobe export functionality to create a single file of the asset in a PNG, JPEG, GIF, or SVG format.
The Export from DAM option is similar to the Package with Links option, except it creates a single file rather than a package of files.
To export an asset from Tenovos:
-
Open the Tenovos asset.
-
In the Story Link tab, open the popup task menu and click Export from DAM.
The Export from DAM panel opens with all low-resolution links selected for conversion to high-resolution. You can de-select any links you do not want converted.
Links that are already high-resolution cannot be selected as they do not require conversion.
-
Click Continue.
The linked low-resolution assets are converted to high resolution, all assets are updated to their latest versions, and the Adobe Export As window opens.
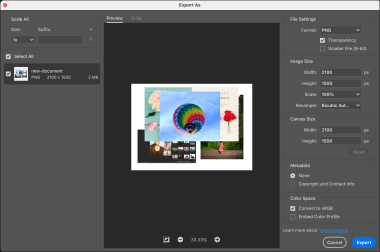
-
Select the export Format, either PNG, JPG, GIF or SVG.

-
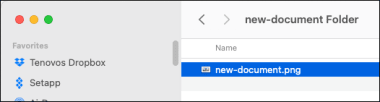
Modify the other options as necessary (see your Adobe documentation for details), then click Export. The Save As window appears.
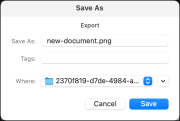
-
Enter the Save As file name, select the Where destination folder, then click Save. The document is saved in the specified format and at the specified location.
Create derivatives of a source asset
With the Create Derivatives option, you can create different versions of a document, in various formats, and upload those versions to Tenovos.
Before creating the new version, Tenovos updates all linked assets in the master document to their latest versions. All the derivative assets are linked with the derivative relationship to the source asset.
To create a derivative of an asset:
-
Open the source Tenovos asset.
-
In the Story Link tab, open the popup task menu and click Create Derivatives.
The Create Derivatives panel opens with all low-resolution links selected for conversion to high-resolution. You can de-select any links you do not want converted.
Links that are already high-resolution cannot be selected as they do not require conversion.

-
Select the rendition(s) that you want. The details you can set for each one varies based on the rendition type.
- JPG: Image Height, Image Width, Quality, Convert to sRGB.
- PNG: Image Height, Image Width, Transparency, Convert to sRGB.
- TIF: Layers, Transparency.
- GIF: Image Height, Image Width, Transparency, Convert to sRGB.
- EPS: No additional settings required.
- PDF: Layers.
-
Click Continue. The import configuration panel opens. It includes the default security and metadata templates.

-
Provide the required information. The information that you must provide may change based on the templates applied to the document.
- Security Templates. Leave the default or choose a new one. You can select multiple security templates.
- Metadata Template. Leave the default selection or choose a new one. Only one metadata template can be applied to an asset.
- Request Title. A description of the request.
-
Provide the optional information. This will vary based on the templates applied to the document.
NOTE: To delete all values and re-enter them, click Clear all metadata values.
-
Click Continue to save the asset to Tenovos. The requested derivatives are generated and uploaded to Tenovos.
To view or hide additional information about the upload progress, click Show Details/Hide Details in the Progress window.
-
Click Refresh in the toolbar to view the derivative asset thumbnail(s) in Tenovos. You may see a “Processing” thumbnail if Tenovos is still processing the file.
Validate assets in a document
The Validate Assets option reviews all linked assets in a document to ensure that they are up-to-date, correctly adjusted, and accessible. It ensures that all assets are current and are associated with the correct IDs. It also confirms that all linked assets are converted to For Placement Only (FPO), and converts assets from high-resolution to low-resolution.
To validate assets in a document:
-
Open the Tenovos document.
-
In the Story Link tab, open the popup task menu and click Validate Assets.
Tenovos validates all linked assets on the document. It ensures that all linked assets are:
- Current
- Associated with the correct IDs
- Converted to For Placement Only (FPO)
- Converts all high-resolution linked assets to low-resolution
For larger documents, a progress bar is displayed.
Update all linked assets in a document
The Fix Stale Versions option updates all linked assets in a document to the current version.
To update all linked assets in a document:
-
Open the Tenovos document.
-
In the Story Link tab, open the popup task menu and click Fix Stale Versions.
Tenovos reviews all linked assets. Outdated versions are updated with the latest version available in Tenovos.
- For larger documents, a progress bar is displayed.
- If all assets are up-to-date, Story Link displays a message stating that there are no stale (outdated) assets in the document.

Convert all linked assets to high resolution
Tenovos-linked assets that you add to a document are imported as low-resolution. The Flip to High Res option converts all low-resolution linked assets in a document to high-resolution.
To convert low-resolution assets to high-resolution:
-
Open the Tenovos document.
-
In the Story Link tab, open the popup task menu and click Flip to High Res.
The Flip to High Res panel opens with all low-resolution links (orange indicator) selected for conversion to high-resolution. You can de-select any links you do not want converted.
- Links that are already high-resolution (green indicator) cannot be selected as they do not require conversion.
- If there are no low-resolution assets, Story Link informs you that none require conversion.

-
De-select any assets that you do not want to convert to high resolution. Then click Continue.
The low-resolution assets are converted to high-resolution.