Metadata administration
For a workflow overview on creating a metadata template, click here!
Metadata templates organize metadata attributes specific to a particular asset type. They are applied to assets during upload, tagging them with relevant information to enhance searching, filtering, and organization. Metadata templates streamline metadata management, ensuring assets are appropriately tagged both at upload and after being added to Tenovos.
In Admin, the Metadata tab is where you create, configure, and manage metadata templates and their building blocks—groups, tables, cascades, attributes, and vocabularies.
The Metadata tab includes the following pages:
- Templates. Organize metadata attributes specific to a particular asset type. They are applied to assets during upload, tagging them with relevant information to enhance searching, filtering, and organization. They are built using groups, tables, cascades, attributes, and vocabularies.
- Groups. Cluster similar metadata attributes together for easy addition to, and display in, a metadata template. They divide a metadata template into visual sections.
- Tables. Organize and display attribute fields in rows and columns. Tables can be added to groups.
- Cascades. Present attribute options based on previously selected values in a related attribute. Cascades can be added to tables.
- Attributes. Create textbox, date, and dropdown attributes that can be added to groups and tables.
- Vocabularies. Create sets of values which allow assets to be tagged and retrieved using a consistent language. Vocabularies are required to create dropdown attributes.
Admin > Metadata:

At-a-glance: Create a metadata template
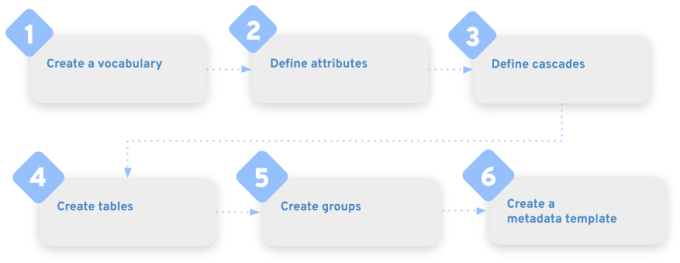
Metadata templates are made up of vocabularies, attributes, cascades, tables, and groups. These are the "building blocks" of metadata templates. The minimum prerequisite to making a functional metadata template is at least one existing group containing at least one attribute.
If you want to create a metadata template that includes all available building blocks, you must define them in this order:
- Create a vocabulary.
A vocabulary is a set of values which allow assets to be tagged and retrieved using a consistent language. Vocabularies are required to create dropdown attributes. - Define attributes.
Metadata attributes provide information about an asset, for example, File Size, File Type, and Color Space. In Admin > Metadata > Attributes, you can create three types of attributes TextBox, Date, and Dropdown. They can be added to groups and tables. - Define cascades.
Cascades present attribute options based on previously selected values. For example, given a first level cascade of “Breakfast,” “Lunch,” and “Dinner,” selecting “Breakfast” limits the cascade’s second level to items related to Breakfast. Cascades can be added to tables. - Create tables.
Tables organize and display attribute fields in rows and columns. They can be added to groups. - Create groups.
Metadata groups cluster similar metadata attributes together for easy addition to, and display in, a metadata template. They divide a metadata template into visual sections. - Create a metadata template.
Metadata templates organize attributes specific to a particular asset type. After you have defined a vocabulary, attributes, cascades, tables, and groups, you can create a metadata template that incorporates all these building blocks.
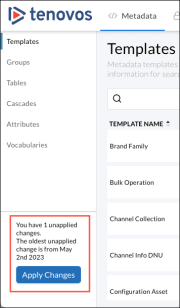
Apply metadata edits
After you complete all edits in Admin > Metadata, you must Apply Changes to initiate the reindexing process. This process collects all requests from the change request table and applies it to the Content gallery data. The changes you make in the Metadata tab will not be visible in the Content gallery until you click Apply Changes.
Metadata templates
Metadata templates organize metadata attributes specific to a particular asset type. They are applied to assets during upload, tagging them with relevant information to enhance searching, filtering, and organization.
In the administrative Metadata tab, you build metadata templates with groups, tables, cascades, attributes, and vocabularies.
NOTE: After upload, users with the appropriate permissions can modify the metadata template selection.
- Vocabularies. A controlled set of values which allow assets to be tagged and retrieved using a consistent language. May also be referred to as a "controlled vocabulary."
- Attributes. Information about an asset such as File Size, Color Space, and Last Updated.
- Cascades. Metadata attributes that are driven by values. The previous value drives the available values for the next attribute. Cascading metadata attributes require vocabularies that are associated with attributes.
- Tables. An arrangement of metadata attributes in rows and columns for addition to a metadata template.
- Groups. Related metadata attributes that are combined for use in a metadata template.
Metadata template privilege requirements
Creating and managing metadata templates requires the Metadata Template Management administrative privilege and access to the Tenovos Admin pages.
Users with any one of the following privileges can access the Admin pages:
- Metadata Template Management
- Security Template Management
- Content Transformation Management
- Rights Management
Applying a metadata template at upload
At upload, users select a Metadata Template to apply and then provide the requested attribute values. In the following example, the Metadata Template is “Image” and the Title is “Forest - temperate”.

After upload, the required information is available in Asset Details. In the following example, the Image Info group indicates that the asset Title is "Forest - temperate".

For asset management, the information required by the metadata template and supplied by the user facilitates content searches, filtering, and organization. In the following screenshot, assets were filtered by Title is "Forest - temperate".

Types of metadata templates
Tenovos offers a variety of metadata templates that are associated with specific Tenovos features. For example, a Proof Submission template is available to those who have enabled the proofing feature.
This Tenovos Metadata Admin Guide discusses the standard asset metadata template type of “Asset.” This template type is applied to all assets that are uploaded to Tenovos.

View the metadata Templates page
To view the metadata Templates page, go to Admin > Metadata > Templates.
About the metadata Templates page
The metadata Templates page displays the following information for each template:
(1) New Template. Create a new metadata template.
(2) Search field. Search for a specific metadata template.
(3) Template Name. Name of the metadata Template which will appear when defining the metadata of an asset.
(4) In Use. Whether or not the metadata Template has been assigned to an asset.
(5) Created Date. Date when the metadata Template was created.
(6) Late Updated. Date when the metadata Template was last updated.
(7) Duplicate. Create a copy of the metadata template.
(8) Delete. Delete the metadata template.
Admin > Metadata > Templates:

Create a metadata template
The minimum prerequisite to making a functional metadata template is one group containing at least one attribute. If you want to create a metadata template that includes all available building blocks, you must define them in the order outlined by At-a-glance: Create a metadata template.
To create a metadata template:
-
In Admin > Metadata > Templates, click New Template.

-
Enter a Template Name (1). The name can be a maximum of 75 characters.
-
Set the Template Type to Asset (2). This is the default selection.
-
Select the metadata groups to add by scrolling through the groups list or using the Search groups field to locate a specific group, then clicking Add Selected /< # /> ("3" in the preceding image).
The metadata template screen refreshes and the metadata group sections are displayed. All sections are expanded to display the attributes in each group you selected. You can collapse or expand the groups as needed.

-
To reorder the groups, click the drag icon (1) of a group and move it to a new location.
-
To apply access templates to this metadata template, click Add Access Templates (2) and make your selections.
NOTE: For more details, see Access Templates.
-
To add more groups, click Add group (3) to open the groups dialog box. Scroll to or use Search groups to locate specific groups.
Select the groups to add, then click Add Selected to close the dialog and return to the metadata template configuration screen.
NOTE: The Add Selected option displays the total count of all selected groups—the previously selected groups plus the ones you are adding.

-
To set the default value for an attribute, click the attribute field to open the Set Default Value dialog box. Then select a value (for dropdown attributes) (1) or enter a value (2).
Click Save to confirm your entry and close the Set Default Value dialog.
When the metadata template is applied to an asset, the default values are automatically selected.

-
-
In the metadata template configuration screen, click Save. You are returned to the Templates page and the new template is included in the list of templates.
-
Click Apply Changes to update the Content gallery data. The changes you make in Admin > Metadata will not be visible in the Content gallery until after you apply your edits.
Edit a metadata template
Editing templates that are currently in use will affect all instances of that template. Your changes will be propagated to all assets with that template applied and current values might be outdated.
In Admin > Metadata > Templates, the In Use column displays “No” if the template is not in use.
To edit a metadata template:
-
Go to Admin > Metadata > Templates and scroll to or Search for the template. Then click its entry to open its configuration screen.
-
For saved metadata templates, you can:
-
Click Save to confirm your changes and return to the Templates page.
-
Click Apply Changes to update the Content gallery data.
Rename a metadata template
To rename a metadata template:
- In Admin > Metadata > Templates, scroll to or Search for the template, then click its entry to open its configuration screen.
- Edit the template name. The name can be a maximum of 75 characters.
- Click Save to confirm your changes and return to the Templates page.
- Click Apply Changes to update the Content gallery data.
Reorder groups in a metadata template
To reorder groups in a metadata template:
- In Admin > Metadata > Templates, scroll to or Search for the template, then click its entry to open its configuration screen.
- Click the group’s drag icon and move it to a new location.
- Click Save to confirm your changes and return to the Templates page.
- Click Apply Changes to update the Content gallery data.
Add groups to a metadata template
To add groups to a metadata template:
-
In Admin > Metadata > Templates, scroll to or Search for the template, then click its entry to open its configuration screen.
-
Click Add group to open the groups dialog box. Scroll to or use Search groups to locate specific groups.

-
Select the groups to add, then click Add Selected to close the dialog and return to the metadata template configuration screen.
NOTE: The Add Selected option displays the total count of all selected groups—the previously selected groups plus the ones you are adding.
-
Click Save to confirm your changes and return to the Templates page.
-
Click Apply Changes to update the Content gallery data.
Remove groups from a metadata template
To remove groups from a metadata template:
-
In Admin > Metadata > Templates, scroll to or Search for the template then click its entry to open its configuration screen.
-
Locate the group you want to remove and click Delete.
-
Click Save to confirm your changes and return to the Templates page.
-
Click Apply Changes to update the Content gallery data.
Apply access templates to a metadata template
Access templates grant selected user groups access to metadata templates. When an access template is applied to a specific metadata template, only members of the user groups specified in the access template will be able to view or edit that metadata template. Members of all other user groups will not see it.
For more details, see Access Templates.
To apply access templates to a metadata template:
-
In Admin > Metadata > Templates, scroll to or Search for the template, then click its entry to open its configuration screen.
-
Click Add Access Templates and make your selections.
-
Click Save to confirm your changes and return to the Templates page.
-
Click Apply Changes to update the Content gallery data.
Set default values for attributes in a metadata template
When a metadata template is applied to an asset, the default values are automatically selected.
To set the default values for attributes in a metadata template:
-
In Admin > Metadata > Templates, scroll to or Search for the template, then click its entry to open its configuration screen.
-
Click the attribute field to open the Set Default Value dialog box, then select a value (for dropdown attributes) or enter a value. Repeat as necessary.
-
Click Save to confirm your changes and return to the Templates page.
-
Click Apply Changes to update the Content gallery data.
Delete a metadata template
You can delete any metadata template that is not currently in use. On the Templates page, the In Use column displays “No” if the template is not being used.
To delete a metadata template:
-
In Admin > Metadata > Templates, locate the template and click Delete.
NOTE: You cannot delete a template that is currently in use. If you attempt to delete a template that is in use, an error message will appear.
-
At the confirmation prompt, click Yes, delete.
-
Click Apply Changes to update the Content gallery data.
Duplicate a metadata template
You can duplicate a metadata template from its configuration page or the metadata Templates page.
To duplicate a metadata template:
-
In Admin > Metadata > Templates, locate the template, then complete one of the following:
-
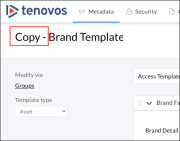
Click Duplicate. The new template opens in its configuration page with the word “Copy” added to the original template name.
-
Open its configuration page, then click Duplicate. The new template opens in its configuration page with the word “Copy” added to the original template name.
-
-
Make any required edits and then Save your changes.
-
Click Apply Changes to update the Content gallery data.
Metadata groups
Metadata groups allow you to cluster similar metadata attributes together for easy addition to, and display in, a metadata template.
Groups in a metadata template:

View the metadata Groups page
To view the Groups page, go to Admin > Metadata > Groups.
About the metadata Groups page
The Groups page displays the following information:
(1) New Group. Create a new metadata group.
(2) Search field. Search for a specific metadata group.
(3) Group Name. Name of the metadata group which appears when setting up metadata templates.
(4) In Use. Count of the metadata templates where the group is being used. If the group is not in use, this column displays “No.”
(5) Created Date. Date when the metadata group was created.
(6) Last Updated. Date when the metadata group was last updated.
(7) Duplicate. Create a copy of the metadata group.
(8) Delete. Delete the metadata group.
You can click the Group Name, In Use, Created Date, or Last Updated column heading to sort the list in ascending or descending order based on that heading.
Admin > Metadata > Groups:

Create a metadata group
To create a group:
-
In Admin > Metadata > Groups, click New Group. The group configuration page opens.
IMAGE: Group configuration page

-
Enter a Group Name.
TIP: Add “Group” to group names to distinguish them from other metadata items. Groups, tables, cascades, attributes, and vocabularies must have unique names. If you attempt to give a metadata item a name that already exists, you will be informed that the name is already in use.
-
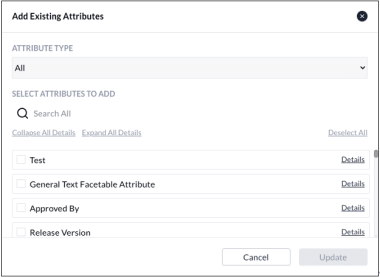
Add attributes to the group. Click Select Attributes to open the Add Existing Attributes dialog box.
IMAGE: Add Existing Attributes dialog box
-
Select an Attribute Type. You can view all attributes or filter the attribute list by either Date, Dropdown, Table, or TextBox.
- Use the Search field to locate a specific attribute.
- Click Details to view additional information about an attribute.
- Click Expand All Details to view information about all attributes.
- Click Collapse All Details to hide the expanded information.
-
Click the check boxes of the individual attributes to add to the group. To clear all attribute selections, click Deselect All.
-
You can continue filtering the list by attribute type and making your selections.
As you scroll through the attribute list, a prompt appears that allows you to View selected and display only the attributes you have selected.
IMAGE: "View selected" prompt

-
Click Update to add the selected attributes to the group. The Add Existing Attributes dialog closes and you are returned to the group configuration page with the selected attributes listed in the order in which they will appear in a metadata template.
- To continue adding attributes, click Select Attributes.
- To remove an attribute from the group, click Remove (x).
- To move an attribute, click its move icon to drag and drop it to a new location.
-
Click Save. The group configuration page closes and the new attribute group is added to the Admin > Metadata > Groups page.
Edit a metadata group
You can edit a group name and add, remove, or move attribute selections.
For quick access, groups that are in use also provide links to the Attributes, Cascades, and Tables pages.
IMAGE: Links to Attributes, Cascades, and Tables

IMPORTANT: Editing a group that is currently in use will affect all instances of that group.
To edit a metadata group:
-
Go to Admin > Metadata > Groups and scroll to or Search for the group, then click its entry to open its configuration screen.
-
For saved tables, you can:
- Edit the group name.
- Add attributes to the group. Click the Select Attributes button and make your selections.
- Remove (x) an attribute.
- Reorder the attributes. Click an attribute’s reorder icon and drag and drop it to its new location.
-
Click Save to confirm your changes and return to the Groups page.
-
Click Apply Changes to update the Content gallery data.
Delete a metadata group
You can delete any group that is not currently in use. On the Groups page, the In Use column displays “No” if the group is not being used.
IMAGE: "In Use" column displays "No"

To delete a metadata group:
-
In Admin > Metadata > Groups, locate the group and click Delete (x).
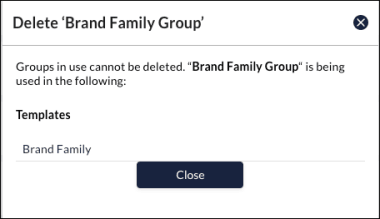
NOTE: You cannot delete a group that is currently in use. If you attempt to delete a group that is in use, an error message will appear indicating which templates include the group. Remove the group from the templates, then try again.
IMAGE: "In use" error message
-
At the confirmation prompt, click Yes, delete.
Duplicate a metadata group
You can duplicate a group from the Groups page or from its configuration page.
To duplicate a group:
-
In Admin > Metadata > Groups, locate the group, then:
-
Click its Duplicate button. The new group opens in its configuration page with the word “Copy” added to the original group name.
-
Open its configuration page, then click the Duplicate. The new group opens in its configuration page with the word “Copy” added to the original group name.
IMAGE: "Copy" added to the original group name

-
-
Make any required edits and then Save your changes.
Tables
Tables in a metadata template allow you to organize and display asset attribute fields in rows and columns. Tables can be added to groups.
There are two types of tables: standard and smart.
- Standard tables store data as a single object and are ideal for simpler datasets or situations where row-level filtering and searching aren't required. For more details, see Standard tables.
- Smart tables process data on a row-by-row basis, treating each row as an individual entity. They offer greater control over filtering and categorization, making them well-suited for complex datasets. For more details, see Smart tables.
The following sections describe each table type, their use cases, and how they differ in functionality.
About standard tables
Standard tables treat all data as a single object. This means that even if a table contains multiple distinct values, the system will consider the entire table as one unified entity. While useful for simpler datasets, this approach can limit the precision of search and filtering operations.
-
You can convert a standard table to a smart table, but not the other way around.
-
Duplicate and blank rows are not allowed and will be ignored.
Use standard tables for:
- Simpler data structures: Standard tables are ideal when data doesn’t require detailed filtering or searching. They offer a high-level overview of information, making them suitable for simpler datasets with less complex categorization needs.
About smart tables
Smart tables process data on a row-by-row basis, treating each row as an individual entity. This approach allows for more granular control over filtering and categorization, making smart tables ideal for complex datasets that require detailed management.
- Each smart table must include at least one column with a facetable attribute.
- You can have a maximum of 25 smart tables.
- You can convert a standard table to a smart table, but not the other way around.
- Duplicate and blank rows are not allowed and will be ignored.
Use smart tables for:
- Row-level filtering: Filters are applied to individual rows, offering a more focused and accurate view of the data.
- Focused searchability: Search operations are more effective because they target specific fields within each row, allowing for faster and more accurate results.
- Accurate categorization: Smart tables ensure data is categorized based on real, row-level values rather than aggregated data.
Comparison: Standard table vs smart table
This section provides an example of how search results differ between a standard table and a smart table.
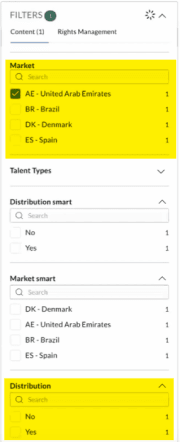
In this example, we have an asset with a metadata template containing two tables: a standard "Distribution Table" and a smart "Distribution Table Smart." Both tables contain the same information:
- A Market column listing four markets: United Arab Emirates, Brazil, Spain, and Denmark
- A Distribution column with "Yes" only for United Arab Emirates (AE).
Standard table and smart table in a metadata template:

Standard table behavior
In a standard table, data is treated as a single unit. When you filter by "United Arab Emirates (AE)" in the Market column, the filter returns both the "Yes" and "No" entries in the Distribution column, even though the only value set at "Yes" is for United Arab Emirates. (See preceding screenshot in Comparison: Standard table vs smart table.This happens because the system treats the entire table as one object, so it includes all distribution statuses from the table, not just the one relevant to "United Arab Emirates (AE)."
Standard table: Filter returns both "Yes" and "No" from the Distribution column:
Smart table behavior
In a Smart Table, each field is treated individually. When you filter by "United Arab Emirates (AE)" in the Market smart column, the filter returns only "Yes" from the Distribution Smart column, because it focuses specifically on the data in that row. (See screenshot in Comparison: Standard table vs smart table.) This means the filter is more precise, showing only the relevant value for the selected market.
Smart table: Filter returns only "Yes" from the "Distribution Smart" column:

Summary
-
Standard table: Treats the entire table as a single entity, leading to broader search results (e.g., both "Yes" and "No" values for Distribution).
-
Smart table: Analyzes each row individually, providing more focused and accurate results based on the specific row data (e.g., only the United Arab Emirate "Yes" value for Distribution Smart).
View the Tables page
To view the Tables page, navigate to Admin > Metadata > Tables.
About the Tables page
The Tables page displays the following information:
(1) New Table. Create a new table.
(2) Search field. Search for a specific table.
(3) Table Name. Name of the table which appears when setting up groups.
(4) In Use. Count of the groups where the table is being used. If the table is not in use, this column displays “No.”
(5) Created Date. Date when the table was created.
(6) Last Updated. Date when the table was last updated.
(7) Actions. Delete the table or convert a standard table to a smart table.
You can sort the list by clicking on the Table Name, In Use, Created Date, or Last Updated column headings.
Admin > Metadata > Tables

Create a standard table
Standard tables store data as a single object and are ideal for simpler datasets or situations where row-level filtering and searching aren't required. (For more details, see Standard tables.)
To create a standard table:
-
Create a new table.
In Admin > Metadata > Tables, click New Table. The New Table dialog box opens.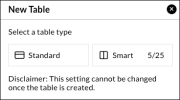
-
Choose the table type.
Click the Standard table type.The table configuration page opens.
NOTE: You cannot change this setting after the table is created. You can convert a standard table to a smart table, but not the other way around.
-
Enter the Table Name.
TIP: Add “Table” to the name to differentiate it from other metadata items, such as groups, cascades, attributes, and vocabularies. -
Configure the row settings.
Select either Single Row or Multiple Row.
NOTE: You cannot change this setting after you save the table.- Single Row. Only one row is available to users.
- Multiple Row. Users can add rows to the metadata template.
-
Add table columns.
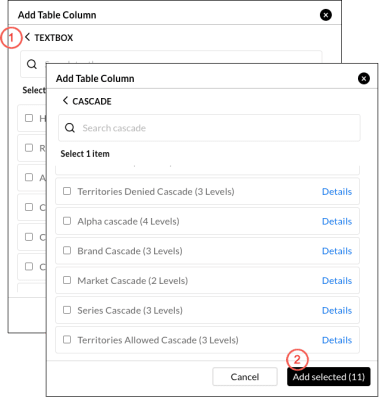
Click Add table column (+) to add up to 12 table columns. The Add Table Column dialog opens.
-
Select a table column type.
- Textbox. Allows users to input text in single-line or multi-line fields, with a customizable character limits.
- Date. Captures and manages date-related metadata for assets.
- Dropdown. Provides a controlled list of predefined options (the vocabulary) for users to select from. Dropdowns can be either single-select or multi-select and require existing vocabularies.
- Cascades. Present attribute options based on previously selected values in a related attribute field.
NOTE: You can add multiple column types to a table. In the Add Table Column dialog, click the Back arrow (1) to return to the column type selection screen and choose another type. The Add selected button (2) will display the number of columns you have selected.
-
Select column items.
For each column type, select the items you want to include. You can choose up to 12 items total, with a mix of column types.In the Add Table Column dialog:
- Use the Search field to find a specific Textbox, Date, Dropdown, or Cascade item.
- Click Details to view more information about an item.
- Click Back (<) to choose a different column type.
- Click Add selected to save your choices, add them to the table, and return to the table configuration page.
-
Save and configure columns.
In the table configurations screen, click Save to save the table and return to the Tables page. You can also:- Remove a column. Click the Remove (X) icon next to a column.
- Move a column. Click the move icon next to a column to drag and drop it into a new position. The column order will be updated.
- Add more columns. Scroll to the right and click Add table column to add up to 12 columns. If the table already has twelve columns, the option to add more will not available.
Create a smart table
Smart tables process data on a row-by-row basis, treating each row as an individual entity. This provides greater control over filtering and categorization, making them ideal for managing complex datasets.
- Each smart table must include at least one column with a facetable attribute.
- You can create a maximum of 25 smart tables.
- You can convert a standard table to a smart table, but not the other way around.
- Duplicate and blank rows are not allowed and will be ignored.
For more details, see Smart tables.
To create a smart table:
-
Create a new table.
In Admin > Metadata > Tables, click New Table. The New Table dialog box opens. -
Choose the table type.
Click the Smart table type.The smart table configuration page opens.
NOTE: You cannot change this setting after the table is created. You can convert a standard table to a smart table, but not the other way around.
-
Enter the Table Name.
TIP: Add “Table” to the name to differentiate it from other metadata items, such as groups, cascades, attributes, and vocabularies. -
Add table columns.
Click Add table column (+) to add up to 12 table columns. The Add Table Column dialog opens. -
Select a table column type.
IMPORTANT: Smart tables must include at least one column with a facetable attribute.- Textbox. Allows users to input text in single-line or multi-line fields, with a customizable character limits.
- Date. Captures and manages date-related metadata for assets.
- Dropdown. Provides a controlled list of predefined options (the vocabulary) for users to select from. Dropdowns can be either single-select or multi-select and require existing vocabularies.
- Cascades. Present attribute options based on previously selected values in a related attribute field.
NOTE: You can add multiple column types to a table. In the Add Table Column dialog, click the Back arrow (1) to return to the column type selection screen and choose another type. The Add selected button (2) will display the number of columns you have selected.
-
Select column items.
For each column type, select the items you want to include. You can choose up to 12 items total, with a mix of column types.In the Add Table Column dialog:
- Use the Search field to find a specific Textbox, Date, Dropdown, or Cascade item.
- Click Details to view more information about an item.
- Click Back (<) to choose a different column type.
- Click Add selected to save your choices, add them to the table, and return to the table configuration page.
-
Save and configure columns.
In the table configurations screen, click Save to save the table and return to the Tables page. You can also:- Remove a column. Click the Remove (X) icon next to a column.
- Move a column. Click the move icon next to a column to drag and drop it into a new position. The column order will be updated.
- Add more columns. Scroll to the right and click Add table column to add up to 12 columns. If the table already has twelve columns, the option to add more will not available.
Convert a standard table to a smart table
You can convert a standard table to a smart table, but not the other way around. The conversion cannot be undone. Once converted, the table will display SMART next to its name in the Tables screen. Clicking its entry opens the smart table configuration screen.
IMPORTANT: You can convert a standard table to a smart table, but not the reverse.
To convert a standard table to a smart table:
-
Navigate to Admin > Metadata > Tables.
-
Locate the table and click Convert in the Actions column.
-
At the confirmation prompt, click Yes.
-
Click Apply Changes. The system confirms the conversion with the message "Reindex applied successfully."
-
Verify the conversion.
Return to the list of tables and locate the table again. It should now display SMART next to it, indicate it has been converted to a smart table. Clicking the table opens the smart table configuration screen.
Edit a table
You can modify a table's name and add, remove, or reorder columns. You cannot change the Single Row or Multiple row setting, or switch between standard and smart table formats (although you can convert a standard table to a smart table).
You can modify a table name and add, remove, or move column selections. You cannot adjust the Single Row or Multiple Row setting. Or change a table setting from standard to smart or vice versa. (You can, however, convert a standard table to a smart table.)
IMPORTANT: Editing a table that is currently in use will affect all instances of that table.
NOTE: For quick access, tables that are in use also link to the Attributes and Cascades pages.
To edit a table:
-
Go to Admin > Metadata > Tables. Search for or scroll to the table, then click its entry to open its configuration screen.
-
For saved tables, you can:
- Edit the table name.
- Add a table column: Click the Add table column button. If the button is not available, the table already has the maximum allowed of 12 columns.
- Remove a column: Click its Delete (x) button.
- Reorder a column: Click a column’s reorder icon and drag it to its new location.
-
Click Save to confirm your changes and return to the Tables page. Or Cancel to return without saving.
-
Click Apply Changes to update the Content gallery data.
Delete a table
You can delete any table that is not associated with a group. If the table is in use, the In Use column will display “Yes.”
If you try to delete a table that is in use, an error message will appear. Remove the table from the group and then try again.
To delete a table:
-
In Admin > Metadata > Tables, locate the table and click its Delete (x) button.
-
At the confirmation prompt, click Yes, delete.
Cascades
Cascades present attribute options based on previously selected values in a related attribute field. They can be added to tables and streamline metadata selection by dynamically filtering options based on prior choices.
For example, as displayed in the following table, selecting "Dessert" in a recipe attribute category will limit the options in the "Type" field to choices like Chocolate, Fruit, Cake, and Cookies, while excluding other categories such as "Sandwiches" or "Roasts." Similarly, selecting the "Type" of Cake, limits the options to cake recipes.
Attribute group "Recipes":
| Category | Type | Recipe |
|---|---|---|
| Breakfast | Chocolate | Butter Cake |
| Lunch | Fruit | Cherry Cake |
| Dinner | Cake | Coffee Cake |
| Dessert | Cookies | Lemon Pudding Cake |
Key features:
- Cascade Levels: Cascades can have up to four levels, where each level represents an attribute linked to the previous one. At least two levels are required.
- Mapping Values: Attribute values in one level are mapped to those in the next level. For example, selecting "Dessert" in the Category field will show related "Type" options like Cookies or Cake.
- Multi-Select: Attributes with multi-select enabled cannot be included in a cascade.
- Editing and Deleting: Cascades can be edited to change mapped values or names. A cascade can be deleted only if it is not in use by any table.
Cascade management:
- Create: New cascades can be created by defining levels and mapping values between them.
- Edit: Existing cascades can be modified by updating mapped values, but the cascade structure cannot be changed.
- Delete: A cascade can be deleted if not associated with any table.
View the Cascades page
To display the Cascades page, go to Admin > Metadata > Cascades.
About the Cascades page
The Cascades page displays the following information:
(1) New Cascade. Create a new cascade.
(2) Search field. Search for a specific cascade.
(3) Cascade Name. Name of the cascade which appears when setting up tables.
(4) In Use. Count of the tables in which the cascade is being used. If the cascade is not in use, this column displays “No.”
(5) Created Date. Date when the cascade was created.
(6) Last Updated. Date when the cascade was last updated.
(7) Delete. Delete the cascade.
You can click the Cascade Name, In Use, Created Date, or Last Updated column heading to sort the list in ascending or descending order based on that heading.
Admin > Metadata > Cascades:

Create a cascade
To create a cascade:
-
In Admin > Metadata > Cascades, click New Cascade. The cascade configuration page opens.
IMAGE: Cascade configuration page

-
Enter a Cascade Name.
TIP: Add “Cascade” to cascade names to distinguish them from other metadata items. Groups, tables, cascades, attributes, and vocabularies must have unique names. If you attempt to give a metadata item a name that already exists, you will be informed that the name is already in use.
Define cascade levels
-
Define the attribute cascade levels. A cascade must contain at least two levels and can contain up to four levels.
- For each level, select a defined attribute.
- To add another level, click Add Level (+).
- To remove a level, click Delete (x).
- Attributes with the Multi-Select setting enabled cannot be added to cascades.
IMAGE: Multi-Select setting enabled

-
Click Next to continue to the mapping screen to view the cascade levels you have selected, and the Level 1 values.
- To modify your level selections, click Edit Levels to return to the previous Define attribute cascade levels screen and make your changes.
IMAGE: Edit Levels button

- To map values, continue to the next step.
- To modify your level selections, click Edit Levels to return to the previous Define attribute cascade levels screen and make your changes.
Map attribute values
-
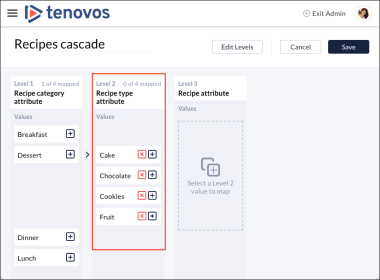
Map the cascade Level 1 values to the Level 2 values. For each Level 1 value, click its plus sign to open the Map Value dialog box and select the check boxes of the Level 2 values to map to the selected Level 1 value.
In the following Map Value dialog box, the Recipe category attribute of “Dessert” is being mapped to values in the Level 2 Recipe type attribute.
(1) Click the check box to the left of each applicable Level 2 value to match them to the Level 1 attribute.IMAGE: Map Value dialog box

(2) Search for a value by entering its name into the Search Values field.
(3) Click Select All to select all values.
(4) Click Deselect all to clear all selected values. -
Click Update to confirm the mapped values and return to the cascade configuration screen. The mapped values for the Level 1 value are listed in the Level 2 column.
- To remove a mapped attribute, click Delete (x).
- To map a Level 2 value to a Level 3 value (if applicable), click Add (+).
IMAGE: Click Delete (X) or Add (+)
-
Continue mapping all Level 1 values to Level 2 values. And, if applicable, map all Level 2 values to Level 3 values, and all Level 3 values to Level 4 values.
-
Click Save. The new cascade is added to the Admin > Metadata > Cascades list.
Create a DCCV cascade
The process for creating cascades with Dynamic Concatenated Controlled Vocabularies and attributes is the same as for “standard” vocabularies and attributes. See Create a cascade for instructions.
Edit a cascade
You can modify the mapped values of a saved cascade and edit its name. You cannot delete or redefine the attribute cascade levels.
To edit a cascade:
-
Go to Admin > Metadata > Cascades and scroll to or Search for the cascade, then click its entry to open its configuration screen.
Cascade configuration screen:

-
Edit the cascade name or add or remove mapped attribute values.
-
Click Save to confirm your changes and return to the Cascades page.
-
Click Apply Changes to update the Content gallery data.
Delete a cascade
You can delete any cascade that isn't associated with a table. On the Cascades page, the In Use column displays “No” if the cascade is not associated with a table.
If you attempt to delete a cascade that is in use, an error message will appear. Remove the associated table and then try again.
To delete a cascade:
-
In Admin > Metadata > Cascades, locate the cascade and click Delete (x).
-
At the confirmation prompt, click Yes, delete.
Attributes
Metadata attributes provide information about an asset, for example, File Size, File Type, and Color Space. When applied to assets, these attributes enhance content search, filtering, and organization, allowing for efficient metadata management across your system.
In Admin > Metadata > Attributes, you can create three types of attributes:
- TextBox. Allows users to input text in single-line or multi-line fields.
- Date. Captures date-related metadata for assets.
- Dropdown. Provides a controlled list of predefined options (the vocabulary) for users to select from. Dropdowns can be either single-select or multi-select and require existing vocabularies.
These attributes can include tooltips which display additional information when users hover over the icon next to the attribute.
Tenovos also includes predefined attributes, such as AI Tags, which automatically tag image and video assets with metadata upon upload, helping improve searchability and content organization.
For sensitive metadata, Tenovos offers a Sensitive attribute property that hides or blurs values for unauthorized users. Only authorized users with specific permissions can view sensitive data. This feature is crucial for managing sensitive information such as PII or financial data.
Types of attributes
TextBox attribute
TextBox attributes allow users to input text in single-line or multi-line fields, with a customizable maximum character length. These attributes help manage and and organize asset metadata, offering customization options for input restrictions and field behaviors. For step-by-step instructions, see Create a TextBox attribute.
-
Enables text input in single-line (up to 2,000 characters) or multi-line (up to 10,000 characters) formats.
-
Options for customization include required fields, facetable filters, read-only settings, searchability, and character limits.
-
Can be linked to technical metadata for automated updates.
Date attribute
Date attributes capture and store date-related information, allowing users to manage and filter date-based metadata for assets. For detailed instructions, see Create a Date attribute.
-
Used to capture and store date-related information, helping with date-based metadata management and filtering.
-
Customizable settings include required fields, facetable filters, read-only settings, searchability, and sensitive data protection.
Dropdown attribute
Dropdown attributes allow users to select data from a controlled list of options (the vocabulary). They can be either single-select or multi-select and require an existing vocabulary. This attribute type standardizes metadata input while allowing customization through synonyms and technical mappings. For detailed instructions, see Create a Dropdown attribute.
-
Provides a controlled vocabulary list, allowing users to select from predefined options.
-
Supports single-select or multi-select options, and allows for customization through synonyms and technical metadata mapping.
-
Settings include required fields, facetable filters, and sensitive data protection. Searchability is enabled by default and cannot be modified.
Attribute configuration settings
- Facetable: Makes the attribute available as a filter in the Content gallery.
- Read Only: Users can only view, not edit, the attribute.
- Required: Marks the attribute as mandatory.
- Searchable: Includes the attribute in applicable search results.
- Sensitive: Blurs or hides the value for unauthorized users.
- Tooltip: Provides descriptive help text when hovering over the information icon next to the attribute.
- Multi-Select: (Dropdown attributes.) Allows users to select multiple options from the dropdown.
- Synonyms: (Dropdown attributes.) Allows users to add synonyms for vocabulary values in the dropdown, making the options more flexible for various terms.
- Technical Metadata Mapping: (Dropdown attributes.) Maps the Dropdown attribute to technical metadata, overriding manually entered data when a new asset version is created. This option is unavailable if Required or Typeahead settings are selected.
Managing metadata attributes
To manage your metadata attributes, navigate to Admin > Metadata > Attributes. Here you can:
- Create new attributes (TextBox, Date, or Dropdown).
- Edit existing attributes, adjusting settings such as character limits, required fields, or tooltips.
- Delete attributes, ensuring they are not in use within any groups or templates.
Each attribute type has specific settings, including options for customizing its behavior, such as adding synonyms for dropdown values or enabling typeahead for TextBox attributes.
View the Attributes page
To display the Attributes page, go to Admin > Metadata > Attributes.
About the Attributes page
The Attributes page displays the following information:
(1) New Attribute. Create a new attribute.
(2) Search field. Search for a specific attribute.
(3) Attribute Name. Name of the attribute which appears when setting up cascades, tables, and groups, and when viewing asset details.
(4) Type. The type of attribute, either Text (“TextBox”), Date, or ControlledVocabulary (“Dropdown”).
(5) In Use. The total count of the attribute’s use in cascades, tables, and vocabularies. If the attribute is not in use, this column displays “No.”
(6) Created Date. Date when the attribute was created.
(7) Last Updated. Date when the attribute was last updated.
(8) Delete. Delete the attribute.
You can sort the list in ascending or descending order by clicking one of these column headings: Attribute Name, Created Date, or Last Updated.
Admin > Metadata > Attributes:

Create an attribute
There are three types of metadata attributes.
- TextBox. Users can input text in single-line or multi-line fields.
See Create a TextBox attribute. - Date. Captures date-related metadata for assets.
See Create a Date attribute. - Dropdown. Users can select from a controlled list of predefined options (the vocabulary).
See Create a Dropdown attribute.
New Attribute dialog box:

Create a TextBox attribute
TextBoxes allow users to input text into fields, with options for both single-line and multi-line text input.
To create a TextBox attribute:
-
In Admin > Metadata > Attributes, click New Attribute.
-
Click TextBox. The following screen is displayed.

-
Choose the Text Type:
- Text Box. Single line text attribute. Allows users to enter a single line of text with a maximum character limit of 2,000.
- Text Area. Multi-line textbox attribute. Allows users to enter text spanning multiple lines with a maximum character limit of 10,000.
Your selection will determine the attribute General settings available in Step 5.
-
Enter the Attribute Name.
TIP: Add “Name” to attribute names to distinguish them from other metadata items. Groups, tables, cascades, attributes, and vocabularies must have unique names. If you attempt to give a metadata item a name that already exists, you will be informed that the name is already in use.
-
Select the attribute General settings.
For a Text Type of “Text Box” (Step 3), you can select Required, Facetable, Read Only, Searchable, Typeahead, and Sort by Hit Count. For a Text Type of “Text Area” (Step 3) you can select Required, Searchable, and Read Only.
- Required. Marks the attribute as required when providing the asset metadata information.
NOTE: Technical Metadata Mapping is not available for the Required setting. See Step 8.
-
Facetable. Adds the attribute as a filter option in the Content gallery.
-
Read Only. Makes the attribute read only. When setting up the asset metadata, users can only view this field.
-
Searchable. Allows the asset to be included in applicable search results.
-
System. N/A. This is a system setting.
-
Typeahead. The attribute will display a typeahead dropdown when users type three or more characters in the text field on the Edit Asset and Upload Assets screens. The list of values is driven by the existing values for the text attribute among all assets in Tenovos.
NOTE: Technical Metadata Mapping is not available for the Typeahead setting. See Step 8. -
Sort by Hit Count. With Typeahead enabled, the total number of assets with this attribute is displayed next to each value. With Sort by Hit Count selected, typeahead values in the dropdown are sorted in descending order based on this count. If left unchecked, values for this field are sorted alphabetically.
-
Sensitive. Flags the metadata attribute as sensitive and blurs or hides its values for unauthorized users. For more information, see Attribute property SENSITIVE.
- Required. Marks the attribute as required when providing the asset metadata information.
-
Max Character Length. (Required.) Sets the maximum number of characters the attribute can accept while setting up the metadata.
- For a Text Box, you can specify a character length from 1 to 20,000 characters. If you also select the Typeahead setting (Step 5), the maximum is 250 characters.
- For a Text Area, you can specify a maximum character length of 1 to 10,000 characters.
-
Tooltip Text. Enter descriptive text about this attribute. You can enter up to 100 characters.
If a tooltip is available, an information icon is displayed next to the attribute on every screen where metadata can be entered or edited. Hovering over the icon displays the help text. -
Technical Metadata Mapping. Map this TextBox attribute to one or more technical metadata (techmeta) key attributes. Click the field to view the dropdown and make your selections.
With Technical Metadata Mapping, when users create a new version of an asset, Tenovos will map this TextBox attribute to the technical metadata values that you specify. Manually entered data will be overridden.
This option is unavailable when the Required or Typeahead settings are selected.
NOTE: The options in the Technical Metadata Mapping dropdown list are determined by the “TechMeta Mapping” vocabulary. For a list of the technical metadata key attributes maintained by the vocabulary, see Admin > Metadata > Vocabularies > TechMeta Mapping.
Only one techmeta key can be mapped to a TextBox attribute.
- Click Save to create the new TextBox attribute.
Create a Date attribute
Date fields capture and store date-related information.
To create a Date attribute:
-
In Admin > Metadata > Attributes, click New Attribute.
-
Click Date. The following screen is displayed with an Attribute Type of “Date.”
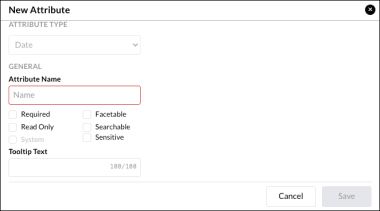
-
Enter the Attribute Name.
TIP: Add “Name” to attribute names to distinguish them from other metadata items. Groups, tables, cascades, attributes, and vocabularies must have unique names. If you attempt to give a metadata item a name that already exists, you will be informed that the name is already in use.
-
Select the attribute General settings.
-
Required. Marks the attribute as required while setting up the asset metadata.
-
Facetable. Adds the attribute as a filter option in the Content gallery.
-
Read Only. Makes the attribute read only. When setting up the asset metadata, users can only view this field.
-
Searchable. Allows the asset to be included in applicable search results.
-
System. N/A. This is a system setting.
-
Sensitive. Flags the metadata attribute as sensitive and blurs or hides its values for unauthorized users. For more information, see Attribute property SENSITIVE.
-
- Tooltip Text. Enter descriptive text about this attribute. You can enter up to 100 characters.
If a tooltip is available, an information icon is displayed next to the attribute on every screen where metadata can be entered or edited. Hovering over the icon displays the help text. - Click Save to create the new Date attribute.
Create a Dropdown attribute
Dropdowns allow users to select data from a controlled list of options (the vocabulary). Dropdowns can be either single-select or multi-select, and require existing vocabularies.
To create a Dropdown attribute:
-
In Admin > Metadata > Attributes, click New Attribute.
-
Click Dropdown. The following screen is displayed with an Attribute Type of “Dropdown.”

-
Select a Vocabulary. This determines the options presented to users in the dropdown box.
-
Enter the Attribute Name.
TIP: Add “Name” to attribute names to distinguish them from other metadata items. Groups, tables, cascades, attributes, and vocabularies must have unique names. If you attempt to give a metadata item a name that already exists, you will be informed that the name is already in use.
-
Select the attribute General settings.
-
Required. Marks the attribute as required while setting up the asset metadata.
-
Facetable. Adds the attribute as a filter option in the Content gallery.
-
Read Only. Makes the attribute read only. When setting up the asset metadata, users can only view this field.
-
Multi-Select. Allows users to select multiple options in the dropdown list.
-
Searchable. N/A. Allows the asset to be included in applicable search results. This setting is enabled by default and cannot be modified.
-
System. N/A. This is a system setting.
-
Sensitive. Flags the metadata attribute as sensitive and blurs or hides its values for unauthorized users. For more information, see Attribute property SENSITIVE.
-
-
Tooltip Text. Enter descriptive text about this attribute. You can enter up to 100 characters.
If a tooltip is available, an information icon is displayed next to the attribute on every screen where metadata can be entered or edited. Hovering over the icon displays the help text. -
Technical Metadata Mapping. Map this Dropdown attribute to one or more technical metadata (techmeta) key attributes. Click the field to view the dropdown and make your selections.

With Technical Metadata Mapping, when users create a new version of an asset, Tenovos will map this Dropdown attribute to the technical metadata values that you specify. Manually entered data will be overridden.
This option is unavailable when the Required or Typeahead settings are selected.
NOTE: The options in the Technical Metadata Mapping dropdown list are determined by the “TechMeta Mapping” vocabulary. For a list of the technical metadata key attributes maintained by the vocabulary, see Admin > Metadata > Vocabularies > TechMeta Mapping.
Only one techmeta key can be mapped to a Dropdown attribute.
-
Add Synonyms to the dropdown list. (Optional.) Click the Plus sign to add synonyms for one of the Vocabulary values that you selected in Step 3.

Select a vocabulary value, provide a synonym, and press Enter to add it to the text box. Add as many synonyms as needed.
-
To remove a vocabulary synonym entry, click Remove Vocabulary Synonym (x).
-
To remove a vocabulary value and all its synonyms, click Remove Vocabulary Value (-).
-
To filter the vocabulary and synonym list to a specific vocabulary value, click All Values and make your selection.
-
-
Click Save to create the new Dropdown attribute.
Edit an attribute
The attributes settings you can edit vary based on the Attribute Type. Note that once saved, you cannot change the Attribute Type.
For each attribute type, you can edit the following:
-
TextBox attributes. Attribute Name, General settings, Max Character, Tooltip Text, and Technical Metadata Mapping. See Create a TextBox attribute for details about these settings.
-
Date attributes. Attribute Name, General settings, Tooltip Text, Max Character Length. See Create a Date attribute for details about these settings.
-
Dropdown attributes. Attribute Name, General settings, Tooltip Text, Technical Metadata Mapping, and Synonyms. See Create a Dropdown attribute for details about these settings.
To edit an attribute:
-
Go to Admin > Metadata > Attributes and scroll to or Search for the attribute, then click its entry to open its Edit Attribute dialog.
IMAGE: Edit Attribute dialog for a Dropdown attribute

-
For each attribute type, you can edit the following:
-
TextBox attributes. Attribute Name, General settings, Max Character, Tooltip Text, and Technical Metadata Mapping.
-
Date attributes. Attribute Name, General settings, Tooltip Text, Max Character Length.
-
Dropdown attributes. Attribute Name, General settings, Tooltip Text, Technical Metadata Mapping, and Synonyms.
You cannot change the Attribute Type of a saved attribute.
-
-
Save your changes.
Delete an attribute
You can delete any attribute that is not associated with a group or template. On the Attributes page, the In Use column indicates if the attribute is currently associated with groups or templates.
IMAGE: In Use column

If you attempt to delete an attribute that is in use, an error message will appear. Remove the associated groups or templates and then try again.
IMAGE: In Use error message

To delete an attribute:
-
In Admin > Metadata > Attributes, locate the attribute and click Delete (x).
-
At the confirmation prompt, click Yes, delete.

Pre-defined attributes
In Admin > Metadata, you can create attributes for your specific needs. Tenovos also provides pre-defined attributes.
AI TAGS attribute
Tenovos uses AI to automatically tag image and video assets during upload, adding metadata with a confidence rating of 95% or higher. This process helps address inconsistencies in manual tagging, tight project timelines, and challenges from multiple users working with the same assets.
AI-generated tags are searchable within minutes, enabling faster content creation and sharing. The increased tag volume improves search accuracy, making it easier for users to find the assets they need.
Requirements for AI tags:
- AI-generated tags require the AI Tags metadata attribute and a corresponding metadata template which must be applied at upload.
- Tags are only generated during asset upload. Changing the metadata template after upload will not trigger AI tagging.
NOTE: AI tags can be generated retroactively. Contact Customer Success for details.
AI-generated tags

Example template: Admin > Metadata > Templates > Asset Info

Attribute properties list
The following properties are available when creating or editing attributes as described in:
- Create a TextBox attribute. Available properties are Required, Facetable ("Text Box" attribute only), Read Only, Searchable, Typeahead ("Text Box" attribute only), and Sort by Hit Count ("Text Box" attribute only), and Sensitive.
- Create a Date attribute. Available properties are Required, Facetable, Read Only, Searchable, and Sensitive.
- Create a Dropdown attribute. Available properties are Required, Facetable, Read Only, Multi-Select, Searchable, and Sensitive.
Attribute property REQUIRED
Marks the attribute as required when providing the asset metadata information.
- Applies to: Text attribute type of “Text Box,” Text attribute type of “Text Area,” Date attribute type, and Dropdown attribute type.
Attribute property FACETABLE
Adds the attribute as a filter option in the Content gallery.
- Applies to: Text attribute type of “Text Box,” Date attribute type, and Dropdown attribute type.
Attribute property READ ONLY
Makes the attribute read only. When setting up the asset metadata, users can only view this field.
- Applies to: Text attribute type of “Text Box,” Text attribute type of “Text Area,” Date attribute type, and Dropdown attribute type.
Attribute property MULTI-SELECT
Allows users to select multiple options in a dropdown list.
- Applies to: Dropdown attribute type.
Attribute property SEARCHABLE
Allows the asset to be included in applicable search results.
- Applies to: Text attribute type of “Text Box,” Text attribute type of “Text Area,” Date attribute type, and Dropdown attribute type.
Attribute property SYSTEM
This is a system setting and is not editable.
Attribute property TYPEAHEAD
The attribute will display a typeahead dropdown when users type three or more characters in the text field on the Edit Asset and Upload Assets screens. The list of values is driven by the existing values for the text attribute among all assets in Tenovos.
- Applies to: Text attribute type of “Text Box.”.
Attribute property SORT BY HIT COUNT
With Typeahead enabled, the total number of assets with this attribute is displayed next to each value. With Sort by Hit Count selected, typeahead values in the dropdown are sorted in descending order based on this count. If left unchecked, values for this field are sorted alphabetically.
- Applies to: Text attribute type of “Text Box.”
Attribute property SENSITIVE
The Sensitive property allows admins to flag certain metadata attributes as sensitive, such as Personally Identifiable Information (PII), financial, or confidential program/product data. When enabled, the values of these attributes are hidden or blurred for unauthorized users.
Sensitive attributes enabled at the asset level and are controlled by security templates. Only user groups assigned to a security template and granted the Sensitive Data permission will see the sensitive metadata attribute values.
Key features:
- Sensitive metadata values are blurred for unauthorized users and can be unblurred by users with the Sensitive Data permission.
- Sensitive attributes are not exposed in network calls to unauthorized users.
- Sensitive attributes are excluded from metadata exports for unauthorized users and included for authorized users. They are color coded for easy identification.
IMAGE: Color coded for easy identification

Limitations:
- You can enable the Sensitive property for up to 50 attributes.
- If a metadata attribute is both Sensitive and Required, system restrictions may affect users. Specifically, if the attribute is Required and does not have a default value, users without permission to view sensitive data will be unable to edit or upload assets. (This does not apply to Bulk Operations.)
- If you enable the Sensitive property for a metadata attribute and have integrations with Tenovos, ensure your API user account has Sensitive Data permission. Without it, sensitive attribute values may not be returned via the API.
Sensitive metadata viewed in Asset Details:

Attribute tooltips
Textbox, Date, and Dropdown attributes can include a descriptive tooltip. When a tooltip is defined, the metadata attribute displays an information icon next to it. Tooltips are available to users when viewing the Asset Details page and on every screen where metadata can be entered or edited.
You supply tooltip text when you create or edit a Text attribute, Date attribute, or Dropdown attribute.
Vocabularies
Vocabularies provide a standardized set of values that allow assets to be tagged and retrieved using consistent terminology. Vocabularies are linked to dropdown attributes and can be reused across multiple metadata groups, ensuring uniformity and ease of use.
For search and sorting, vocabularies are treated as text. Letters, dates, and numbers are sorted alphabetically and in ascending order, from the number 0 to the letter Z.
View the Vocabularies page
To view the Vocabularies page, go to Admin > Metadata > Vocabularies.
About the Vocabularies page
The Vocabularies page displays the following information:
(1) New Vocabulary. Create a new vocabulary.
(2) Search field. Search for a specific vocabulary.
(3) Vocabulary List Name. Name of the vocabulary that appears when setting up attributes.
(4) Values. List of values in the vocabulary.
(5) In Use. The number of attributes using the vocabulary. Displays "No" if not in use.
(6) Created Date. Date when the vocabulary was created.
(7) Last Updated. Date when the vocabulary was last updated.
(8) Duplicate. Create a copy of the vocabulary.
(9) Delete. Delete the vocabulary.
You can sort the list in ascending or descending order by clicking one of these column headings: Vocabulary List Name, In Use, Created Date, or Last Updated.
Admin > Metadata > Vocabularies

View the vocabulary configuration page
To view the configuration page for a specific vocabulary, go to Admin > Metadata > Vocabularies. Then click a vocabulary to open its configuration page.
(1) Current Values column.
(2) Clear the value field.
(3) Add a value to the Current Values list.
(4) User List. Switch between “Create New Value” field and “Add New User” selection list. Turn on the User List when attributes must be assigned to users in the system.
(5) Search the Current Values.
(6) Select all values in the Current Values list
(7) Sort the Current Values list in ascending or descending order.
(8) Refresh the vocabulary configuration screen.
(9) Select the value.
(10) Edit the value name.
(11) Saved values display their system ID.
(12) Add. Move the selected value from the Removed Values column to Current Values column.
(13) Remove. Move the selected value from the Removed Values column to the Current Values column.
(14) Removed Values column.
(15) Cancel. Close the vocabulary configuration screen without saving your changes.
(16) Save the vocabulary configuration and return to the Vocabularies page.
Vocabulary configuration page:

Create a vocabulary
To create a vocabulary:
-
In Admin > Metadata > Vocabularies, click New Vocabulary. The vocabulary configurations screen is displayed.

-
Enter a Vocab List Name.
TIP: Add “list” to vocabulary names to distinguish them from other metadata items. Groups, tables, cascades, attributes, and vocabularies must have unique names. If you attempt to give a metadata item a name that already exists, you will be informed that the name is already in use.

-
Add values to the vocabulary. You can choose to:
-
Create New Value. Enter a value, then press Enter or click New Value (+) to add it to the Current Values list.
-
Add New User. To create values for attributes that must be assigned to users in the system, turn on the User List toggle. Then use the dropdown list to select users in the system. Continue adding values, as necessary.
NOTE: If the vocabulary must contain a mix of users and other values, select the users first, then add the other values. After you save the vocabulary, you cannot change the User List toggle setting.
-
-
Click Save to create the vocabulary and return to the Vocabularies page.
IMAGE: Controlled vocabulary saved successfully

-
Click Apply Changes to update the Content gallery data.
Edit a vocabulary
To edit a vocabulary:
-
In Admin > Metadata > Vocabularies, click the vocabulary to open its configuration screen.
-
Edit (1) a value name, Add (2) removed values back to the Current Values list, and Remove (3) a current value.
IMAGE: Edit a vocabulary

-
Click Save to create the vocabulary and return to the Vocabularies page.
-
Click Apply Changes to update the Content gallery data.
Update values
To update values in a vocabulary:
-
Open the vocabulary's configuration page.
-
Click Edit on the value you want to update.
-
Make and accept your changes.
-
Save the vocabulary.
-
Click Apply Changes to update the Content gallery data.
Remove values
To remove values in a vocabulary:
-
Open the vocabulary's configuration page.
-
In the Current Values list, select the values to remove or Select all.
-
Click Remove to move the values to the Removed Values list.
-
Save the vocabulary.
-
Click Apply Changes to update the Content gallery data.
Restore removed values
Removed values are stored in a vocabulary's Removed Values column and can be restored to the vocabulary.
To restore values in a vocabulary:
-
Open the vocabulary's configuration page.
-
In the Removed Values list, select the values to restore or Select all.
-
Click Add to return the values to the Current Values list.
-
Save the vocabulary.
-
Click Apply Changes to update the Content gallery data.
Duplicate a vocabulary
To duplicate a vocabulary:
On the Vocabularies page, click Duplicate next to the vocabulary. The duplicate vocabulary's configuration page opens with "Copy" appended to the original name.
Delete a vocabulary
You can delete any vocabulary that is not in use. On the Vocabularies page, the In Use column indicates if the vocabulary is currently associated with attributes.
IMAGE: In Use column

If you attempt to delete a vocabulary that is in use, an error message will appear. Remove the vocabulary from the listed attributes and then try again.
IMAGE: In Use error message

To delete a vocabulary:
-
In Admin > Metadata > Vocabularies, locate the vocabulary and click Delete (x).
-
At the confirmation prompt, click Yes, delete.
-
Click Apply Changes to update the Content gallery data.
Combine vocabularies into a Dynamic Concatenated Controlled Vocabulary (DCCV)
DCCVs allow you to merge up to five source vocabularies into a single controlled vocabulary. Any changes made to source vocabularies are automatically reflected in the DCCV.
NOTE: This section assumes the following.
- You are familiar with APIs
- You have access to a Tenovos API Key
- Your Tenovos tenant is using Tenovos API v1 or v1.5.
To configure a DCCV, make a POST request to the /metadata/vocabulary endpoint.
Header
The header of this call should include:
- An
x-api-key - Valid
Authorization - A
Content-Typeofapplication/json - For users on v1 of the API, a valid
accessToken. This is not required for v1.5.
Body
The body of the request should contain the following in JSON format.
- name. The name of the new DCCV.
- type. To create a DCCV, this should be set to
dynamic. - sources. This is an array of the metadataDefinitionSearchField of up to five controlled vocabularies. A controlled vocabulary's metadataDefinitionSearchField is usually its name in lowercase with the any whitespace replaced with underscores. For example, the metadataDefinitionSearchField of a controlled vocabulary called "Video Category List" is "video_category_list".
EXAMPLE REQUEST BODY
{
  "name": "File Types",
  "type:": "dynamic",
  "sources": [
    "Video File Types",
    "Image File Types",
    "Audio File Types"
  ]
}
After you create the DCCV, it is added to the Tenovos Vocabularies list.
DCCVs are listed on the Vocabularies page.

The source vocabulary is displayed next to each DCCV value:
