Proofing
Tenovos Proofing streamlines the review and approval process for assets added to Tenovos. It allows users to share and collect feedback on asset proofs, making creative collaboration easier and more effective. By automating key aspects of the workflow and centralizing feedback in one platform, it ensures teams stay in sync and can make informed decisions in real-time.
Tenovos Proofing:
- Automates asset approval workflows
- Centralizes review feedback
- Provides project visibility and clarity
- Ensures version accuracy
When an asset proof is created, it is sent to the Proof Viewer where reviewers can comment, request changes, approve, or reject it. Each asset proof moves through one or more review stages, each involving one or more reviewers. If changes are needed, the proof creator can update the asset and upload a new version for further review. Once approved, the final version is added to Tenovos as a new version of the original asset.
Permissions and roles
Proofing permissions control user access to creating, reviewing, and managing proofs. These permissions are managed through security templates, roles, and administrative privileges. User roles include proof creator, proof participant, and proof administrator, each with specific access requirements.
-
Proof creator permissions. The ability to create an asset proof is available to all users with the Download, Version Asset, and Proof Initiation permissions. These permissions are managed via security templates.
-
Proof participation permissions. The ability to participate in reviews is available to users with the Proof Participation privilege. This privilege is managed via roles.
-
Proof administrator permissions. Users with administrative permissions have access to the Proofs inbox, where they can manage and monitor the proofing process.
All Tenovos users with permission to participate in the proofing process, initiate proofs, or are proof admins will see the Proofs inbox in the Tenovos navigation bar.
Proofing email notifications
Proofing workflows include several types of email notifications. These notifications are configured by an administrator as part of the workflow definition process.
Types of email notifications:
- New Proof Created: Notification sent to all defined reviewers when a new proof is created. The email subject is New Proof Created: [Proof Name]. Recipients can click Open Inbox to view the proof.
- New Proof to Review: Sent to assigned reviewers at each stage of the proof workflow. The email subject line states New Proof to Review [Proof Name]. Users can click Open Inbox to open the Proofs inbox and select the proof to review.
- New Comments on Proof: Notification sent to reviewers and the proof initiator when new comments are added to a proof. The subject line states New Comments on Proof: [Proof Name] . The email includes an option to open the proof and view the comments.
- Action Required: Sent to reviewers when a workflow stage deadline has passed, reminding them to complete their review. The email subject line displays Action Required: [Proof Name] and its messages states that “You have a proof that has the deadline of [Due Date].” Recipients can click Open Inbox to open the Proofs inbox and select the proof to review.
- Decision Confirmation: Sent after a decision has been made on the proof. It notifies all reviewers and initiators of the final decision.
All notification emails include a workflow snapshot of where the asset is in the review process, a preview thumbnail, and an option to either Open Inbox or Open Proof. Clicking the preview thumbnail opens the asset in the proof viewer.
NOTE: Email links are personalized for you. Each reviewer may have different access rights, so you should not share these links.
Using the Proofs inbox
The Proofs inbox lists the proofs that are assigned to you or that you initiated. All Tenovos users with permission to participate in the proofing process, initiate proofs, or are proof admins will see the Proofs inbox in the Tenovos navigation bar.
In addition to the Proofs inbox, users with administrative permissions have access to the proofing Admin Inbox. This opens the proof management dashboard.
Proofs inbox:

The Proofs inbox includes the following information:
-
Preview. Thumbnail of the proof.
-
Name. The proof name.
-
Workflow. The workflow applied to the proof.
-
Initiator. The name of the user who initiated the proof.
-
Proof Status. The status of the proof.
- Approved. The proof has been approved.
- Approved with changes. The proof has been approved after the requested changes have been completed.
- Changes required. The proof has been reviewed and changes are required.
- Failed. The proof has encountered a problem in the workflow and cannot progress.
- In progress. The proof has started and reviewers whose stages have started can access it.
- Late. The proof has reached or passed its set due date.
- Not Relevant. The proof is not relevant to the participant. (This status applies to individual proofing stages.)
-
Created. The date the proof was initiated.
-
Due. The date by which the review must be completed.
-
Actions. The tasks available to you, as determined by your permissions. Options include View Workflow, Open Proof, Create Version, and View Submission.
-
Open Proof. Review the proof.
-
Create Version. Upload the latest version of the asset.
This section covers the following topics related to working with the Proofs inbox:
- Open the Proofs inbox
- Filter the list of proofs
- Search for proofs by name
- Sort the Proofs inbox
- Customize the column display.
Open the Proofs inbox
To open the Proofs inbox:
In the Tenovos navigation bar, click Proofs. The Proofs inbox appears. By default, the display is filtered to Show Only Proofs I’m On.
Filter the Proofs inbox
You can filter the Proofs inbox list by one or more statuses and by your activity. The filters apply to the entire proof, not individual stages.
-
To filter by proof status, click the Filter By Status field and select a status. You can apply multiple filters to the proof list.
Proof statuses include:
- Approved. The proof has been approved.
- Approved with changes. The proof has been approved after the requested changes have been completed.
- Changes required. The proof has been reviewed and changes are required.
- Failed. The proof has encountered a problem in the workflow and cannot progress.
- In progress. The proof has started and reviewers whose stages have started can access it.
- Late. The proof has reached or passed its set due date.
- Not Relevant. The proof is not relevant to the participant. (This status applies to individual proofing stages.)
-
To filter by your activity, click the Show field and select an option.
Proof activities include:- Show Only Proofs I’m On
- Show Only Proofs I Created
- Show Only Proofs To Review
- Show All Proofs (Admin Only)
Search the Proofs inbox
In the Proofs inbox, use the Search field to locate proofs by Name. The proofs list updates with potential matches as you type.
Sort the Proofs inbox
You can use the Proofs inbox column heading arrows to sort the currently-displayed proofs by any heading (except Preview and Actions). By default, the proofs are sorted based on due date, in descending order.
Customize the Proofs inbox column display
To customize the column display:
-
In the Proofs inbox task bar, click Add/Remove Columns to view available columns. By default, all columns are displayed.
-
Select or clear the columns to display or hide. The Proofs inbox updates as you make or clear your selections.
To return the column display to its default, click Reset Columns.
Upload and proof creation
In Tenovos, you can create proofs for individual assets or multiple assets at once. This can be done from Asset Details, the Content Gallery, a collection or the Cart. When creating a proof, you define details like the workflow, security settings, and metadata templates. You can also specify workflow stages and assign reviewers, ensuring that feedback and approvals are streamlined.
Additionally, users can set up proof requests during asset uploads, allowing reviewers to initiate the review process. This creates a more seamless and auotmated workflow for managing creative assets and approvals across teams.
When creating proofs, you can:
Create a proof
You can create proofs from Asset Details, the Content gallery, a collection, or the Cart.
To create a proof:
-
You can create a proof for a single asset or multiple assets simultaneously.
- To create a proof for a single asset, open its Asset Details or its preview context menu and choose Create A Proof.
- To create a proof for multiple assets, select them in the Content gallery, a collection or the Cart. Then open the task bar menu and choose Create A Proof.
NOTE: If you select multiple assets and Create A Proof is not available, you have selected a locked asset or you do not have permission to create a proof of one or more of the selected assets. Try selecting fewer assets until you identify which ones are not available to you for proofing.
-
Click Create a Proof. The Create Proof dialog box opens.
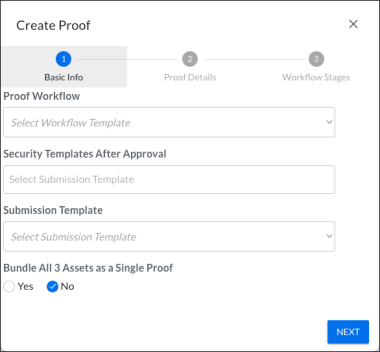
Basic Info page
-
Select the Basic Info templates.
- Proof Workflow. The workflow template which is predefined with the proofing stages, reviewers, proof permissions, triggers, deadline status calculations, and notifications.
- Security Template. The security settings to apply to the asset after it is approved. You can select multiple security templates.
- Submission Template. This template determines the information you must provide in the Proof Details page (Step 5). It is required to submit the proof.
-
If you are creating a proof for multiple assets, choose whether to Bundle all [x] Assets as a Single Proof or create a proof for each asset.
Proof Details page
-
Click Next to display the Proof Details and provide the requested information such as the request title and a description. The requested information will vary based on your organization.

Workflow Stages page
-
Click Next to display the Workflow Stages page. The workflow stages are determined by the “Proof Workflow” you selected in the Basic Info page (Step 3).
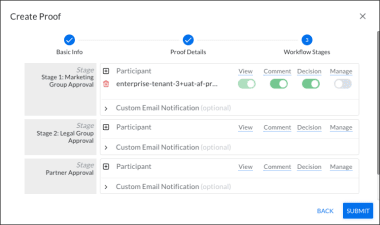
-
A proof workflow can have multiple stages with one or more participants assigned to each stage.
You can leave the Stage and Participant default settings or enable/disable each participant’s ability to View, Comment, make a Decision, and Manage the proof. Your Tenovos role determines the settings you can adjust.- View. User can view the proof. By default, all participants have View permissions; this cannot be disabled.
- Comment. User can select Review Complete but cannot make a decision.
- Decision. User can choose from the decision list.
- Manage. A manager can add participants and toggle the participation selections.
-
Click Submit. A New Proof Created email notification is sent to all assigned reviewers and the proof administrator.
Submit a proof request at asset upload
User roles can be configured to submit a proof request when they upload assets. After upload, a reviewer receives an email notification and the request is added to the Proofs inbox. The reviewer can then choose to Initiate Review and create a proof for the assets, as requested. This process is similar to the one outlined in Create a proof, except the proof is created for someone else.
To submit a proof request at asset upload:
-
In the navigation bar, click Add Files. The Upload Assets screen is displayed.

-
Add the files to upload. You can Drag and Drop Files or Browse your local system to select files.
NOTE: If you complete the the following steps before adding files to upload, the Upload Assets option will change to Create Metadata-only Asset. It will revert to Upload Assets after you add files.
-
Select one or more Security Templates to apply to the assets. This determines user access to the assets after they complete the proofing review process and are approved.
-
Select a Metadata Template for your upload. To initiate a proofing workflow, this template will be called "Asset Submission" or similar.
NOTE: If your account is configured to submit a proof request at upload, you may only see a single metadata template named "Asset Submission" or similar. If you do not see the required template, contact your system administrator.
-
After you have selected a security template and a metadata template, the following toggles will appear:
- Show Required. Toggles optional fields.
- Preference View. Shows or hides specific metadata attribute groups for individual metadata templates. Displays only the attributes that you can edit.
-
Enter the information required by the proofing metadata template you selected. For example, Proof Title, Proof Description, Due Date, and Manager.
-
Click Upload [x] Assets. The Manager (or similarly named reviewer) that you specify will receive a notification that a proof request has been submitted so that they can Create a proof by request.
Create a proof by request
User roles can be configured to submit a proof request at asset upload. After upload, the request is added to the Proofs inbox. The designated reviewer can then choose to Initiate Review and create a proof for the assets, as requested. This process is similar to the one outlined in Create a proof, except the proof is created by a reviewer for someone else.
To create a proof by request:
-
Open the Proofs inbox and locate the request.
-
Open the Actions menu and choose Initiate Review. The Initiate Review window opens.

-
Provide the Title, Review Type, Applied Metadata Template, and Security Templates after Approval:
- Title. By default the title is the one supplied by the user who requested the proof.
- Review Type. This is the proofing workflow. It is predefined with the proofing stages, reviewers, proof permissions, triggers, deadline status calculations, and notifications. The template you select determines the stages for this workflow.
- Applied Metadata Template. Select the metadata template to apply to the requested assets.
- Security Templates after Approval. The security templates to apply to the assets after they are approved.
-
Modify the Stages content or leave them at their defaults. A proof workflow can have multiple stages with one or more participants assigned to each stage. You can leave the Stage and Participant default settings or enable/disable each participant’s ability to View, Comment, make a Decision, and Manage the proof. Your Tenovos role determines the settings you can adjust.
- View. User can view the proof. By default, all participants have View permissions; this cannot be disabled.
- Comment. User can select Review Complete but cannot make a decision.
- Decision. User can choose from the decision list.
- Manage. A manager can add participants and toggle the participation selections.
-
Click Submit. A New Proof Created email notification is sent to all assigned reviewers and the proof administrator.
Review and feedback
Reviewers can access proofs from the Proofs inbox or via personalized notification emails. Each email contains a link to either the proof itself or the Proofs inbox, where you can find the proof you need to review. Once opened in the Proof Viewer, you can add comments, markups, compare versions, and reply to reviewer feedback.
When changes are requested, the proof creator uploads a new version, and all participants are notified. Reviewers with decision rights can finalize the review by selecting a decision (e.g., Approved, Changes Required), while others can provide feedback without affecting the final outcome.
The proof review process includes:
Open a proof
You can open a proof from the Proofs inbox or by using the link in your proofing notification email.
NOTE: Of the five types of notification emails, only the New Comments on Proof notification email includes a link directly to the associated proof. All other emails include a link to open the Proofs inbox.
To open a proof:
You can open a proof via a notification email or directly from the Proofs inbox.
-
To open via a notification email, click the Open Inbox or Open Proof link. If you are already logged into Tenovos, the proof or Proofs inbox is displayed. Otherwise, you must log in to access the link.
NOTE: Email links are personalized for you. Each reviewer may have different access rights, so you should not share these links.
After you log in, the proof or Proofs inbox is displayed.
Locate the proof to open. You can scroll to it or filter, sort, or search for it.
Open the Actions menu for the proof and click Open Proof. A new tab opens with the proof displayed in the proof viewer.
-
To open a proof directly from the Proofs inbox, locate the proof to open. You can scroll to it or filter, sort, or search for it.
Open the Actions menu for the proof and click Open Proof. A new tab opens with the proof displayed in the proof viewer.
Review a proof
The review process begins with an email notifying you that a new proof was created and requires your input. The email contains a personalized link to the proof and includes some context about the content, so you'll know exactly where it is in the review process.
NOTE: Email links are personalized for you. Each reviewer may have different access rights, so you should not share these links.
To review a proof, you will:
- Open the proof in the Proof Viewer.
- Add comments and markups.
- Reply to other reviewer comments.
- Compare multiple versions of a proof.
- Complete your review of a proof.
Create a proof version
When reviewers request changes to a proof, the proof creator makes the revisions and then uploads a new version. Proof creators and users assigned Manage permission in the proof workflow can upload new versions.
To create a proof version:
-
In the Tenovos navigation bar, click Proofs. The Proofs inbox appears. By default, the display is filtered to Show Only Proofs I’m On.
-
Locate the proof to open. You can scroll to it or filter, sort, or search for it.
-
Open the Actions menu for the proof and click Create Version. A Finder window opens.
-
Locate the new version and click Open. The new version is uploaded, the previous preview thumbnail is replaced by the new version, and proof participants are notified via email that there is a new version to review.
Using the Proof Viewer
The Proof Viewer provides multiple ways for you to provide feedback directly on the content you're reviewing. When you review a proof, you will open it in the Proof Viewer. You can then:
- Add comments and markups
- Draw markups
- Reply to other reviewer comments
- Compare multiple versions of a proof
- Complete your review of a proof
Add comments and markups
To add your comments, click the area of the content you want to comment on, then type your message and click Post.
When writing comments, you can use standard text formatting such as bolding, italicizing, and underlining text, and adding bullets and numbers.
Draw markups
You can draw markups directly on proofing content to communicate what you'd like to see changed. To markup content, use the various tools to highlight an area, then enter any required text. The tools available to you include rectangles, circles, arrows, lines, freehand drawing, and text selection.
You can move the toolbar around the screen, selecting and using the appropriate drawing option to indicate where you have feedback. After you've added your markup, enter an associated comment tied to that markup.
Reply to other reviewer comments
When you click on a comment, you are automatically redirected to the area where the comment was made. You can filter and sort all comments, display previous and next comments, search for a comment, and customize the comment display.
To reply to a comment, click Reply to open a text box and enter your response, then click Post.
Compare multiple versions of a proof
There may be times when multiple versions of a proof are routed before a final decision is reached. For those instances, you can use Compare Mode to compare two versions (older and newer) of the content.
When comparing versions, use the tool bar option to:
- Conduct a pixel-by-pixel comparison
- Lock navigation for compared proofs
- Re-sync compared proofs
- Use the Overlay Mode
In Compare Mode, you can still access the "regular" markup and commenting tools.
Complete your review
The proof owner assigns the reviewer roles—either with or without decision rights. Your role determines how you complete your review.
Complete a review when you have decision rights
If you have decision rights, you will be able to select a decision indicating the results of your review, including:
- Decision pending
- Approved
- Approved with Changes
- Changes required
- Not Relevant
After you have made all your markups and annotations, you can click Make decision and choose a decision option. After you select a decision, the proof owner is notified. When all reviewers have submitted their decisions, the final decision is automatically calculated.
Complete a review when do you not have decision rights
If you do not have decisions rights, you can still notify a proof owner that you have finished working on a proof. Your decision does not affect the final decision for the whole proof.
Decision Confirmation
After a decision is made about the proof, the initiator of the proof and its reviewers are informed by an email with the subject Decision Confirmation: [Proof Name]. Recipients can click Open Inbox to open the Proofs inbox and select the proof to review.